Search Phrase = Serve
Privacy Policy
Effective date: March 14, 2018, updated June 15th 2019
Anomaly Studios, LLC, also doing business as Anomaly Learning and the Coding Academy ("company", "us", "we", or "our") operates the https://anomalystudios.com, https://learn.anomalystudios.com, https://classes.anomalystudios.com UnityXD, Coding Academy websites and apps (the "Service").
This page informs you of our policies regarding the collection, use, and disclosure of personal data when you use our Service and the choices you have associated with that data.
We use your data to provide and improve the Service. By using the Service, you agree to the collection and use of information in accordance with this policy. Unless otherwise defined in this Privacy Policy, terms used in this Privacy Policy have the same meanings as in our Terms and Conditions, accessible from https://www.anomalystudios.com/terms-of-use-and-conditions
As stated in our Terms of Use, our website and Services are offered and available only to you, if you are (a) that You have not been previously suspended or removed from the Website by Anomaly Learning; (b) that You are either (i) at least 13 years of age or (ii) Your parent and/or guardian has consented to Your use of the Website; and (c) that your registration and your use of the Website is in compliance with any and all applicable laws and regulations.
We are obligated to ask for your explicit consent and give explicit terms of what users are giving consent to.
Personal Data or Personally Identifiable Information means data about a living individual who can be identified from those data (or from those and other information either in our possession or likely to come into our possession).
"processing" generally covers actions that can be performed in connection with data such as collection, use, storage and disclosure.
Usage Data is data collected automatically either generated by the use of the Service or from the Service infrastructure itself (for example, the duration of a page visit).
Cookies are small pieces of data stored on a User's device. Our website uses cookies to distinguish you from other users of our website. This helps us to provide you with a good experience when you browse our website and also allows us to improve our site. For example, by ensuring that users are finding what they are looking for easily.
Data Controller means the natural or legal person who (either alone or jointly or in common with other persons) determines the purposes for which and the manner in which any personal data are, or are to be, processed.
For the purpose of this Privacy Policy, we are a Data Controller of your data.
Data Processor (or Service Provider) means any natural or legal person (other than an employee of the Data Controller) who processes the data on behalf of the Data Controller.
We may use the services of various Service Providers in order to process your data more effectively.
Data Subject is any living individual who is using our Service and is the subject of Personal Data.
The User is the individual using our Service. The User corresponds to the Data Subject, who is the subject of Personal Data.
We collect several different types of information for various purposes to provide and improve our Service to you.
Our collection, use, and disclosure of Student Data are governed by our Privacy Policy and Terms of Use and also by the provision of the Family Educational Rights and Privacy Act (FERPA), the Children's Online Privacy Protection Act (COPPA), General Data Protection Regulation (GDPR), and applicable state laws that relate to the collection of Student Data.
Our cookies do not collect Personal Information or Children's Personal Information, and we do not combine the general information collected through these cookies with other Personal Information or Children's Personal Information to tell us who you are or what your user name or email address is.
If you come to our business through a sales affiliate, cookies are used to associate your account and information with the sales affiliate in order to calculate sales commissions.
While using our Service, we may ask you to provide us with certain personally identifiable information that can be used to contact or identify you ("Personal Data"). We only ask for Personally Identifiable Information where it is reasonably necessary to provide the Services. Personally identifiable information may include, but is not limited to:
â— Email address
â— First name and last name
â— Phone number
â— Address, State, Province, ZIP/Postal code, City
â— Credit Card Payment Information
â— Your Birthdate and Place of Birth
â— Workplace of School
â— A Photo
â— IP Address
â— Metadata
â— Education Records
â— Cookies and Usage Data
â— Posts on Social Media and more
We may use your Personal Data to contact you with newsletters, marketing or promotional materials and other information that may be of interest to you. You may opt out of receiving any, or all, of these communications from us by following the unsubscribe link or instructions provided in any email we send or by contacting us.
We may also collect information how the Service is accessed and used ("Usage Data"). This Usage Data may include information such as your computer's Internet Protocol address (e.g. IP address), browser type, browser version, the pages of our Service that you visit, the time and date of your visit, the time spent on those pages, unique device identifiers and other diagnostic data.
We may use and store information about your location if you give us permission to do so ("Location Data"). We use this data to provide features of our Service, to improve and customize our Service.
You can enable or disable location services when you use our Service at any time, through your device settings.
We use cookies and similar tracking technologies to track the activity on our Service and hold certain information.We may gather anonymous information about Users through cookie technology on an individual and aggregate level.
Cookies are files with small amount of data which may include an anonymous unique identifier. Cookies are sent to your browser from a website and stored on your device. Tracking technologies also used are beacons, tags, and scripts to collect and track information and to improve and analyze our Service.
Examples of Cookies we use:
â— Session Cookies. We use Session Cookies to operate our Service. which expire after a short time or when you close your browser, and persistent cookies, which remain stored in your browser for a set period of time. We use session cookies to identify you during a single browsing session, like when you log in
â— Preference Cookies. We use Preference Cookies to remember your preferences and various settings.
â— Security Cookies. We use Security Cookies for security purposes.
â— Advertising Cookies. Advertising Cookies are used to Serve you with advertisements that may be relevant to you and your interests.
â— Analytics Cookies. enable us to monitor and analyze web traffic and can be used to keep track of user behavior.
â— Social Media Cookies. We use Social Media Cookies for various Social Media platforms like Facebook, Twitter, Youtube, Linkedin, and Instagram to allow interactions with their services.
â— Email marketing. We collect name and email address when you register for a webinar or event, request a free resource or join a waiting list, via Infusionsoft
Non-Personal Information
Web Beacons, also known as pixel tags and clear GIFs, ("Web Beacons"), are electronic images that allow a website to access cookies and help track marketing campaigns and general usage patterns of visitors to those websites. Web Beacons can recognize certain types of information, such as cookie numbers, time and date of a page view, and a description of the page where the Web Beacons are placed. No Personally Identifiable Information about you is shared with third parties through the use of Web Beacons on our website. However, through Web Beacons, we may collect general information that will not personally identify you, such as: Internet browser, operating system, date of visit, time of visit and path taken through the website.
When we collect usage information (such as the numbers and frequency of visitors to the Website), we only use this data in aggregate form, and not in a manner that would identify you personally. For example, this aggregate data tells us how often users use parts of the Services, so that we can make the Services appealing to as many users as possible. We may also provide this aggregate information to our partners; our partners may use such information to understand how often and in what ways people use our Services, so that they, too, can provide you with an optimal experience. We do not disclose aggregate information to a partner in a manner that would identify you personally.
â— Authentication and security. Cookies help authenticate your access to Anomaly Learning and prevent unauthorized parties from accessing your accounts.
â— Preferences. Cookies help us remember your settings on the pages you visit, so that we can display your preferred content the next time you visit, or preferred language or the country you're in, so we can provide content in your preferred language without asking each time you visit.
â— Analytics and research. Cookies help us test different versions of Anomaly Learning to see which features or content users prefer, web beacons help us determine which email messages are opened, and cookies help us see how you interact with Anomaly Learning, like the links you click on. We also work with a number of analytics partners, including Google Analytics, who use cookies and similar technologies to help us analyze how users use the Services.
â— Personalized content. Cookies help us provide more relevant content.
â— Advertising. To provide you with more relevant advertising. Note that advertising and targeting only happens through our marketing web pages. No marketing or advertising occurs within our platforms when you are logged into your account. We do this so that only advertising appears to parents and not to children. It is our practice and policy to never display advertising to children.
â— Improve Services. Cookies help us analyze user's experience with our services so that we may improve.
Some information is collected automatically by Servers and the services that run the Internet. Additional Metadata is collected for data logs and for security to ensure our platform is a safe place for all. Automatic information collection is described below.
â— Device Information: including your IP address, browser types, browser language, operating system, platform type, gaming platform, device types, and device IDs such as unique identifiers, advertising identifiers, or gaming platform identifiers.
â— Usage Information: including files you download, domain names, landing pages, your browsing activity, what you click, scrolling and keystroke activity, pages viewed, advertising viewed or visited, forms or fields you complete or partially complete, search terms, whether you open an email and your interaction with the content, access times, and error logs, and other similar information.
â— Location Information: including the city, state and ZIP code associated with your IP address, information derived through WiFi triangulation, and precise location information from GPS-based functionality on your mobile devices or from your use of our Mobile Apps, and with your consent, your precise GPS information. (If you are using one of our native apps, and only if you explicitly turned GPS service on within the app, the precise location information from GPS-based functionality will be shared on from your mobile devices or from your use of our Mobile Apps. Your explicit consent is required within our apps for, your precise GPS information to be shared to our systems.)
â— Viewing Behavior: including the content you view, how long you watch each video, the quality of the service you receive (e.g. buffering, load times).
â— Offline Information. Certain information may also be stored while you are offline and transmitted to us when you next connect to the Internet, regardless of where you connect from or the device you use to connect.
Google Analytics
We use a tool called "Google Analytics" to collect information about the users of our services. Google Analytics collects information such as how often users visit our website site, what pages they visit when they do so, and what other sites they used prior to coming to our website. We use the information we get from Google Analytics to analyze performance so we can improve our services, including to help customize our website for users.
Most browsers are initially set up to accept cookies, but you can reset your browser to refuse all cookies or to indicate when a cookie is being sent. However, some features and services (particularly those that require you to sign-in) may not function properly if your cookies are disabled. You may also set your email options to prevent the automatic downloading of images that may contain technologies that would allow us to know whether you have accessed our email and perform certain functions with it.
Through browser preferences, it is also possible to delete Cookies installed in the past, including the Cookies that may have saved the initial consent for the installation of Cookies by our website.
Users can, for example, find information about how to manage Cookies in the most commonly used browsers at the following addresses: Google Chrome, Mozilla Firefox, Apple Safari and Microsoft Internet Explorer.
With regard to Cookies installed by third parties, Users can manage their preferences and withdrawal of their consent by clicking the related opt-out link (if provided), by using the means provided in the third party's privacy policy, or by contacting the third party.
Notwithstanding the above, the Owner informs that Users may follow the instructions provided on the subsequently linked initiatives by the EDAA (EU), the Network Advertising Initiative (US) and the Digital Advertising Alliance (US), DAAC (Canada), DDAI (Japan) or other similar services. Such initiatives allow Users to select their tracking preferences for most of the advertising tools.
Anomaly Studios, LLC uses the collected data for various purposes:
â— To provide and maintain our Service
â— To notify you about changes to our Service
â— To allow you to participate in interactive features of our Service when you choose to do so
â— To provide customer support
â— To gather analysis or valuable information so that we can improve our Service
â— To monitor the usage of our Service
â— To detect, prevent and address technical issues
â— To provide you with news, special offers and general information about other goods, services and events which we offer that are similar to those that you have already purchased or enquired about unless you have opted not to receive such information
â— To comply with applicable laws, regulations, court orders, government and law enforcement agencies' requests.
If you are from the European Economic Area (EEA), our legal basis for collecting and using the personal information described in this Privacy Policy depends on the Personal Data we collect and the specific context in which we collect it.
We may process your Personal Data because:
â— We need to perform a contract with you
â— You have given us permission to do so
â— The processing is in our legitimate interests and it is not overridden by your rights
â— For payment processing purposes
â— To comply with the law
Anomaly Studios, LLC will retain your Personal Data only for as long as is necessary for the purposes set out in this Privacy Policy and that the data is required to offer our services. We will retain and use your Personal Data to the extent necessary to comply with our legal obligations (for example, if we are required to retain your data to comply with applicable laws), resolve disputes, perform our services, and enforce our legal agreements and policies.
Anomaly Studios, LLC will also retain Usage Data for internal analysis purposes. Usage Data is generally retained for a shorter period of time, except when this data is used to strengthen the security or to improve the functionality of our Service, or we are legally obligated to retain this data for longer time periods.
You may exercise your right to request your personal information to be deleted by Anomaly Studios, LLC.
We will hold on to personal information only as long as is reasonably necessary for the purpose for which it was collected. We will securely dispose of it once you no longer have a legitimate reason for retaining it.l
Your information, including Personal Data, may be transferred to - and maintained on - computers located outside of your state, province, country or other governmental jurisdiction where the data protection laws may differ than those from your jurisdiction.
If you are located outside the United States and choose to provide information to us, please note that we transfer the data, including Personal Data, to United States and process it there.
Your consent to this Privacy Policy followed by your submission of such information represents your agreement to that transfer.
Anomaly Studios, LLC will take all steps reasonably necessary to ensure that your data is treated securely and in accordance with this Privacy Policy and no transfer of your Personal Data will take place to an organization or a country unless there are adequate controls in place including the security of your data and other personal information.
If you choose to use our Services from the European Union, please note the following information:
Anomaly Studios, LLC is based in the United States of America. Your personal information is therefore transferred outside the European Union ("EU") and European Economic Area ("EEA"). Such transfer is necessary for the performance of the contract between you Anomaly Studios, LLC
Your PII is also transferred to and processed by third party payment providers and your bank. Such transfers are necessary for performance of the contract between you and Anomaly Studios, LLC(article 49.1 (b) of the GDPR).
In order for us to provide the Services to you, your personal information will be transferred to, and stored at/processed in the United States. Your personal data may also be processed by staff operating outside the European Economic Area (EEA), such as in India and the Philippines, who work for us or for one of our suppliers. We will take all steps reasonably necessary to ensure that your personal data is treated securely and in accordance with this notice.
If you are a resident of the European Economic Area (EEA), you have certain data protection rights. Anomaly Studios, LLC aims to take reasonable steps to allow you to correct, amend, delete or limit the use of your Personal Data.
If you wish to be informed about what Personal Data we hold about you and if you want it to be removed from our systems, please contact us.
In certain circumstances, you have the following data protection rights:
â— The right to refuse to become a data subject
The right to be informed with anything that happens with your personal data and to know what it is used for
â— The right to refuse processing
â— Unless other contractual issues exist or if proprietary company rights exist (of which you should be informed of before you allow your data to be processed) then you can request a copy of your data.
â— The right to erasure
â— The right to access, update or delete the information we have on you. Whenever made possible, you can access, update or request deletion of your Personal Data directly within your account settings section. If you are unable to perform these actions yourself, please contact us to assist you.
â— The right of rectification. You have the right to have your information rectified if that information is inaccurate or incomplete.
â— The right to object. You have the right to object to our processing of your Personal Data.
â— The right of restriction. You have the right to request that we restrict the processing of your personal information.
â— The right to data portability. You have the right to be provided with a copy of the information we have on you in a structured, machine-readable and commonly used format.
â— The right to withdraw consent. You also have the right to withdraw your consent at any time where we relied on your consent to process your personal information.
Please note that we may ask you to verify your identity before responding to such requests.
You have the right to complain to a Data Protection Authority about our collection and use of your Personal Data. For more information, please contact your local data protection authority in the European Economic Area (EEA).
There are some kinds of information you should never provide without student permission including student names, numbers, citizenship, gender, ethnicity, religious and other preferences, grades, GPAs, and class schedules or any other identifiable information.
We may use data which has been de-identified and/or aggregated for product development, research, analytics and other purposes, including for the purpose of analyzing, improving, or marketing the Anomaly Studios, LLC Services. In certain occasions, Anomaly Studios, LLC may share this data with business partners to improve our services or offerings. If we disclose information to authorized business partners to conduct research on online education or assist in understanding the usage, viewing, and demographic patterns for certain programs, content, services, promotions, and/or functionality on our Service, such data will be aggregated and/or anonymized to reasonably avoid identification of a specific individual.
If Anomaly Studios, LLC is involved in a merger, acquisition or asset sale, your Personal Data may be transferred. We will provide notice before your Personal Data is transferred and becomes subject to a different Privacy Policy.
Under certain circumstances, Anomaly Studios, LLC may be required to disclose your Personal Data if required to do so by law or in response to valid requests by public authorities (e.g. a court or a government agency).
Anomaly Studios, LLC may disclose your Personal Data in the good faith belief that such action is necessary to:
â— To comply with a legal obligation
â— To protect and defend the rights or property of Anomaly Studios, LLC
â— To prevent or investigate possible wrongdoing in connection with the Service
â— To protect the personal safety of users of the Service or the public
â— To protect against legal liability
The security of your data is important to us, but remember that no method of transmission over the Internet, or method of electronic storage is 100% secure. While we strive to use commercially acceptable means to protect your Personal Data, we cannot guarantee its absolute security.
We do not support Do Not Track ("DNT"). Do Not Track is a preference you can set in your web browser to inform websites that you do not want to be tracked.
You can enable or disable Do Not Track by visiting the Preferences or Settings page of your web browser.
Anomaly Studios, LLC aims to take reasonable steps to allow you to correct, amend, delete, or limit the use of your Personal Data.
Whenever made possible, you can update your Personal Data directly within your account settings section. If you are unable to change your Personal Data, please contact us to make the required changes.
If you wish to be informed what Personal Data we hold about you and if you want it to be removed from our systems, please contact us.
Schools must annually notify parents of students and eligible students in attendance of their rights under FERPA.
In certain circumstances, you have the right:
â— To access and receive a copy of the Personal Data we hold about you
â— To rectify any Personal Data held about you that is inaccurate. If you believe that any PII we are holding is incorrect or incomplete please send an email with your specific request to support@anomalystudios.com
â— You have the right to request your personal information to not be processed
â— You have the right to give consent to disclosures
â— You have the right to file a complaint
â— To request the deletion of Personal Data held about you
You have the right to data portability for the information you provide to Anomaly Studios, LLC. You can request to obtain a copy of your Personal Data in a commonly used electronic format so that you can manage and move it.
Please note that we may ask you to verify your identity before responding to such requests.
We may employ third party companies and individuals to facilitate our Service ("Service Providers"), to provide the Service on our behalf, to perform Service-related services or to assist us in analyzing how our Service is used.
These third parties may have access to your Personal Data only to perform these tasks on our behalf and are obligated not to disclose or use it for any other purpose. Not all providers below will have your data as this is a full representation of 3rd party providers for all our customers servicing a variety of contracts for platforms and services. Only data that is needed for the delivery of the Service is shared with providers to administer the Service.
Amazon Web Services
â— Hostgator and Endurance International Group: Their privacy policy can be viewed at: https://www.endurance.com/privacy/privacy
â— Google Apps for Business
â— Google Cloud/Firebase
â— Teachable
â— TeamworkPM
â— TeamworkDesk
â— Infusionsoft
â— Zapier
â— ScheduleOnce
â— OneSignal
â— Copper
â— ClickFunnels
â— ShareThis
â— Inspectlet
â— QuickBooks and QuickBooks Payments
â— Tawk.to Live Support: Their privacy policy can be viewed at: https://www.tawk.to/privacy-policy/
â— Cloudflare: Their privacy policy can be viewed at https://www.cloudflare.com/privacypolicy/
We may use third-party Service Providers to monitor and analyze the use of our Service.
â— Google Analytics
â— Google Analytics is a web analytics service offered by Google that tracks and reports website traffic. Google uses the data collected to track and monitor the use of our Service. This data is shared with other Google services. Google may use the collected data to contextualize and personalize the ads of its own advertising network.
â— You can opt-out of having made your activity on the Service available to Google Analytics by installing the Google Analytics opt-out browser add-on. The add-on prevents the Google Analytics JavaScript (ga.js, analytics.js, and dc.js) from sharing information with Google Analytics about visits activity.
â— For more information on the privacy practices of Google, please visit the Google Privacy & Terms web page: http://www.google.com/intl/en/policies/privacy/
We may use third-party Service Providers to show advertisements to you to help support and maintain our Service.
â— Google AdSense & DoubleClick Cookie
â— Google, as a third party vendor, uses cookies to Serve ads on our Service. Google's use of the DoubleClick cookie enables it and its partners to Serve ads to our users based on their visit to our Service or other websites on the Internet.
â— You may opt out of the use of the DoubleClick Cookie for interest-based advertising by visiting the Google Ads Settings web page: http://www.google.com/ads/preferences/
Anomaly Studios, LLC uses remarketing services to advertise on third party websites to you after you visited our Service. We and our third-party vendors use cookies to inform, optimize and Serve ads based on your past visits to our Service.
â— Google AdWords
â— Google AdWords remarketing service is provided by Google Inc.
â— You can opt-out of Google Analytics for Display Advertising and customize the Google Display Network ads by visiting the Google Ads Settings page: http://www.google.com/settings/ads
â— Google also recommends installing the Google Analytics Opt-out Browser Add-on - https://tools.google.com/dlpage/gaoptout - for your web browser. Google Analytics Opt-out Browser Add-on provides visitors with the ability to prevent their data from being collected and used by Google Analytics.
â— For more information on the privacy practices of Google, please visit the Google Privacy & Terms web page: http://www.google.com/intl/en/policies/privacy/
â— Twitter
â— Twitter remarketing service is provided by Twitter Inc.
â— You can opt-out from Twitter's interest-based ads by following their instructions: https://support.twitter.com/articles/20170405
â— You can learn more about the privacy practices and policies of Twitter by visiting their Privacy Policy page: https://twitter.com/privacy
â— Facebook and Instagram
â— Facebook remarketing service is provided by Facebook Inc.
â— You can learn more about interest-based advertising from Facebook by visiting this page: https://www.facebook.com/help/164968693837950
â— To opt-out from Facebook's interest-based ads follow these instructions from Facebook: https://www.facebook.com/help/568137493302217
â— Facebook adheres to the Self-Regulatory Principles for Online Behavioral Advertising established by the Digital Advertising Alliance. You can also opt-out from Facebook and other participating companies through the Digital Advertising Alliance in the USA http://www.aboutads.info/choices/, the Digital Advertising Alliance of Canada in Canada http://youradchoices.ca/ or the European Interactive Digital Advertising Alliance in Europe http://www.youronlinechoices.eu/, or opt-out using your mobile device settings.
â— For more information on the privacy practices of Facebook, please visit Facebook's Data Policy: https://www.facebook.com/privacy/explanation
â— Pinterest
â— Pinterest remarketing service is provided by Pinterest Inc.
â— You can opt-out from Pinterest's interest-based ads by enabling the "Do Not Track" functionality of your web browser or by following Pinterest instructions: http://help.pinterest.com/en/articles/personalization-and-data
â— You can learn more about the privacy practices and policies of Pinterest by visiting their Privacy Policy page: https://about.pinterest.com/en/privacy-policy
We may provide paid products and/or services within the Service. In that case, we use third-party services for payment processing (e.g. payment processors).
We will not store or collect your payment card details. That information is provided directly to our third-party payment processors whose use of your personal information is governed by their Privacy Policy. These payment processors adhere to the standards set by PCI-DSS as managed by the PCI Security Standards Council, which is a joint effort of brands like Visa, Mastercard, American Express and Discover. PCI-DSS requirements help ensure the secure handling of payment information.
The payment processors we work with are:
â— Apple Store In-App Payments
â—‹ Their Privacy Policy can be viewed at https://www.apple.com/legal/privacy/en-ww/
â— Google Play In-App Payments
â—‹ Their Privacy Policy can be viewed at https://www.google.com/policies/privacy/
â— Stripe
â—‹ Their Privacy Policy can be viewed at https://stripe.com/us/privacy
â— PayPal or Braintree
â—‹ Their Privacy Policy can be viewed at https://www.paypal.com/webapps/mpp/ua/privacy-full
â— Authorize.net
â—‹ Their Privacy Policy can be viewed at https://www.authorize.net/company/privacy/
â— Infusionsoft by Keap
â—‹ https://keap.com/legal/privacy-policy
â—‹ https://keap.com/legal/data-security
â—‹ https://keap.com/legal/data-protection-faq
â— WePay by Chase
â—‹ https://go.wepay.com/terms-of-service#us
â—‹ https://go.wepay.com/privacy-policy
Our Service may contain links to other sites that are not operated by us. If you click on a third party link, you will be directed to that third party's site. We strongly advise you to review the Privacy Policy of every site you visit. We have no control over and assume no responsibility for the content, privacy policies or practices of any third party sites or services.
We believe that protecting the privacy of all people is of paramount importance. Protecting the privacy of children is especially important. For that reason we will never collect or maintain information that is not necessary for the delivery of the Service. For account holders of student accounts we only collect a Pseudonym (nick name), username, and password to login to our services. This information is never shared or publicly displayed. Our Service does not address anyone under the age of 13 ("Children") as parents must create and maintain the account.
We do not knowingly collect personally identifiable information from anyone under the age of 13. If you are a parent or guardian and you are aware that your Children has provided us with Personal Data, please contact us. If we become aware that we have collected Personal Data from children without verification of parental consent, we take steps to remove that information from our Servers.
We are proud supporters of the Student Privacy Pledge. Our collection and use of Student Records is governed by our contracts with the Schools, by our Privacy Policy, and by applicable privacy laws. For example, we work with Schools to help protect personal information from the Student's educational record, as required by the Family Educational Rights and Privacy Act ("FERPA"), and to protect the personal information of students under 13 consistent with the Children's Online Privacy Protection Act ("COPPA"). If you have any questions about reviewing, modifying, or deleting the personal information of a School User accessing the Service through a School partner agreement, please contact your School directly.
When our Service is used by a School in an educational setting, we may rely on the School to provide the requisite consent from the child's parents for Anomaly Studios, LLC to collect information from a School User under the age of 13. Look at our Terms of service to see more details on consent for children to use our services
Teachers can create accounts on behalf of Students. When registering an account for a Student who is under the age of 13 (a "Child"), the Teacher represents and warrants that they or the educational organization they work for has proper permission to register the Child to use our services.
By registering and creating an account for your child, your child will not be able to share information, including photos, videos, audio, and location, publicly and with others. If your child shares information publicly, it would have to be outside of our system and it is strongly advised to not do so as it may be indexable by search engines like Google Search. We are not responsible for the content uploaded by any user.
Anomaly Studios, LLC will not Serve personalized ads to your child, which means ads will not be based on information from your child's account. Instead, ads may be Served to a parent or teacher if they have visited our website for marketing purposes. Your child will never be Served ads Served by other (non-Google) ad providers, including ads personalized by third parties because we never advertise to children.
We may update our Privacy Policy from time to time. We will notify you of any changes by posting the new Privacy Policy on this page.
We will let you know via email and/or a prominent notice on our Service, prior to the change becoming effective and update the "effective date" at the top of this Privacy Policy.
You are advised to review this Privacy Policy periodically for any changes. Changes to this Privacy Policy are effective when they are posted on this page.
If you have any questions about this Privacy Policy, please contact us:
â— By email: support@anomalystudios.com
â— By visiting this page on our website: http://www.anomalystudios.com/privacy-policy
â— By mail: Anomaly Studios, LLC. P.O. Box 682592. Franklin, TN 37064
Terms of Use and Conditions
Effective date: March 14, 2018, updated June 15th 2019
Anomaly Studios, LLC, also doing business as Anomaly Learning and the Coding Academy ("company", "us", "we", or "our") operates the https://anomalystudios.com, https://learn.anomalystudios.com, https://classes.anomalystudios.com UnityXD, Coding Academy websites and apps (the "Service").
You should read this entire Terms and Conditions and also our Privacy Policy. Your access to and use of the Service is conditioned upon your acceptance of and compliance with these Terms. These Terms apply to all visitors, users and others who wish to access or use the Service.
By accessing or using the Service you agree to be bound by these Terms. If you disagree with any part of the terms then you do not have permission to access the Service.
If you are under the age of 18, STOP!
You must get your parent or legal guardian to read and accept this Agreement.
The Service is not available to (a) any users previously suspended or removed from the website by anomaly learning or (b) any persons under the age of 13 whose registration has not been approved by a legal parent or guardian.
By clicking the "I Agree" button or by otherwise using or registering an account for the Website, You represent:
(a) that You have not been previously suspended or removed from the Website by Anomaly Learning;
(b) that You are either:
(i) at least 13 years of age or
(ii) Your parent and/or guardian has consented to Your use of the Website;
(c) that your registration and your use of the Website is in compliance with any and all applicable laws and regulations.
We take steps to minimize the collection of personally identifiable information from Users under the age of 13 as explained in the privacy policy. We are committed to protecting your privacy, and have developed our privacy practices to align with applicable laws, including the Family Educational Rights and Privacy Act (FERPA) and the Children's Online Privacy Protection Act (COPPA).
Anomaly Learning does not permit children under the age of 13 (a "Child" or "Children") to create an account without the consent and at the direction of a Parent or School. Please contact us at support@anomalystudios.com if you believe we have inadvertently collected information from a child under 13 without parental consent so that we may delete the information as soon as possible.
When Anomaly Learning is used by a School in an educational setting, we may rely on the School to provide the requisite consent from the child's parents for Anomaly Learning to collect information from a School User under the age of 13.
Additionally, a Child User may use the Website if registered through certain educational organizations and through which education organization the legal parent and/or guardian of such Child User has consented to use the Services. Further, in certain instances, a Child User may use our Service via a third party application that integrate into or with the Services. A Child User that has registered through such external educational organizations, third party applications, or Teachers will only be permitted to use the Service for so long as Anomaly Learning reasonably believes that such access has been consented to by the Child User's parent or guardian.
If you are signing up for this Service and creating accounts on behalf of student(s), you represent and warrant that you are either (a) a teacher or school administrator or otherwise authorized by a school or district to sign up on behalf of students or (b) the parent of such student(s). If you are a school, district, or teacher, you represent and warrant that you are solely responsible for complying with COPPA, meaning that you must obtain advance written consent from all parents or guardians whose children under 13 will be accessing the Services. When obtaining consent, you must provide parents and guardians with these Terms, and our Privacy Policy
You must keep all consents on file and provide them to us if we request them. If you are a teacher, you represent and warrant that you have permission and authorization from your school and/or district to use the Services as part of your curriculum, and for purposes of COPPA compliance, you represent and warrant that you are entering into these Terms on behalf of your school and/or district.
You represent and warrant that you are of legal age to form a binding contract (or if not, you've received your parent's or guardian's permission to use the Services and gotten your parent or guardian to agree to these Terms on your behalf, as we described earlier, and also to agree to these Terms and their own behalf). If you're agreeing to these Terms on behalf of an organization or entity (for example, if you're an administrator agreeing to these Terms on behalf of your district), you represent and warrant that you are authorized to agree to these Terms on that organization or entity's behalf and bind them to these Terms. You also certify that you are legally permitted to use and access the Services and take full responsibility for the selection and use of and access to the Services. This Agreement is void where prohibited by law, and the right to access the Services is revoked in such jurisdictions.
The only Children's Personal Information we require is your parent's email address so we can initiate a parental consent process, as well as non-personal information such as your screen name and password.
We only collect personal information through the Services from a child under 13 where that student's school, district, and/or teacher has agreed (via the terms described in the following paragraphs) to obtain parental consent for that child to use the Services and disclose personal information to us or where the parent or legal guardian of a child has signed the child up to use the Services.
We do not disclose any other information about students, and students assume full responsibility for the disclosure and use of any other personal information the Student chooses to disclose to any User on the Sites, which at all times shall be subject to the terms of our Privacy Policy.
We will never share Education Records with third parties except: as directed by a user (i.e., teacher sharing with another teacher or parent); or to our service providers that are necessary for us to provide the Software, as stated in our Privacy Policy.
In cases where you have authorized or registered another individual, including minor children under the age of 13, to use your account, you are fully responsible for the online conduct of such person, controlling that person's access to and use of the Sites and Services, and the consequences of any misuse by that person. When a student turns 18 years old, or enters a postsecondary institution at any age, the rights under FERPA transfer from the parents to the student ("eligible student").
California Children's Privacy Rights
If you are under the age of 18 residing in California, you are entitled to request removal of content or
information you have posted publicly on our Service.
Please also read our Privacy Policy concerning children below ages of 13 and our adherence to the Children's Online Privacy Protection Act (COPPA) and the Family Educational Rights Privacy Act (FERPA).
By creating an Account on our service, you agree to subscribe to newsletters, marketing or promotional materials and other information we may send. However, you may opt out of receiving any, or all, of these communications from us by following the unsubscribe link or instructions provided in any email we send. We may offer promotional trial subscriptions to access the Services for free or at special discounted prices. If you sign up for a trial subscription, your rights to use the Services are limited by the terms of such trial and will terminate or renew according to the terms of your trial arrangement and/or any applicable Additional Terms.
If you wish to purchase any product or service made available through the Service ("Purchase"), you may be asked to supply certain information relevant to your Purchase including, without limitation, your credit card number, the expiration date of your credit card, your billing address, and your shipping information.
You represent and warrant that: (i) you have the legal right to use any credit card(s) or other payment method(s) in connection with any Purchase; and that (ii) the information you supply to us is true, correct and complete.
The service may employ the use of third party services for the purpose of facilitating payment and the completion of Purchases. By submitting your information, you grant us the right to provide the information to these third parties subject to our Privacy Policy.
We reServe the right to refuse or cancel your order at any time for reasons including but not limited to: product or service availability, errors in the description or price of the product or service, error in your order or other reasons.
We reServe the right to refuse or cancel your order if fraud or an unauthorized or illegal transaction is suspected.
We are constantly updating product and service offerings on the Service. We may experience delays in updating information on the Service and in our advertising on other web sites. The information found on the Service may contain errors or inaccuracies and may not be complete or current. Products or services may be mispriced, described inaccurately, or unavailable on the Service and we cannot guarantee the accuracy or completeness of any information found on the Service.
We therefore reServe the right to change or update information and to correct errors, inaccuracies, or omissions at any time without prior notice.
Any contests, sweepstakes or other promotions (collectively, "Promotions") made available through the Service may be governed by rules that are separate from these Terms & Conditions. If you participate in any Promotions, please review the applicable rules as well as our Privacy Policy. If the rules for a Promotion conflict with these Terms and Conditions, the Promotion rules will apply.
Some parts of the Service are billed on a subscription basis ("Subscription(s)"). You will be billed in advance on a recurring and periodic basis ("Billing Cycle"). Billing cycles are set either on a monthly or annual basis, depending on the type of subscription plan you select when purchasing a Subscription.
At the end of each Billing Cycle, your Subscription will automatically renew under the exact same conditions unless you cancel it or Anomaly Studios, LLC cancels it. You may cancel your Subscription renewal either through your online account management page or by contacting Anomaly Studios, LLC customer support team.
A valid payment method, including credit card or PayPal, is required to process the payment for your Subscription. You shall provide Anomaly Studios, LLC with accurate and complete billing information including full name, address, state, zip code, telephone number, and a valid payment method information. By submitting such payment information, you automatically authorize Anomaly Studios, LLC to charge all Subscription fees incurred through your account to any such payment instruments.
Should automatic billing fail to occur for any reason, Anomaly Studios, LLC will issue an electronic invoice indicating that you must proceed manually, within a certain deadline date, with the full payment corresponding to the billing period as indicated on the invoice.
Anomaly Studios, LLC may, at its sole discretion, offer a Subscription with a free trial for a limited period of time ("Free Trial").
You may be required to enter your billing information in order to sign up for the Free Trial.
If you do enter your billing information when signing up for the Free Trial, you will not be charged by Anomaly Studios, LLC until the Free Trial has expired. On the last day of the Free Trial period, unless you cancelled your Subscription, you will be automatically charged the applicable Subscription fees for the type of Subscription you have selected.
At any time and without notice, Anomaly Studios, LLC reServes the right to (i) modify the terms and conditions of the Free Trial offer, or (ii) cancel such Free Trial offer.
Anomaly Studios, LLC, in its sole discretion and at any time, may modify the Subscription fees for the Subscriptions. Any Subscription fee change will become effective at the end of the then-current Billing Cycle.
Anomaly Studios, LLC will provide you with a reasonable prior notice of any change in Subscription fees to give you an opportunity to terminate your Subscription before such change becomes effective.
Your continued use of the Service after the Subscription fee change comes into effect constitutes your agreement to pay the modified Subscription fee amount.
Except when required by law, paid Subscription fees are non-refundable by default but could be approved by Anomaly Studios, LLC.
Our Service allows you to post, link, store, share and otherwise make available certain information, text, graphics, videos, or other material ("Content"). You are responsible for the Content that you post on or through the Service, including its legality, reliability, and appropriateness.
You consent to our publication of User-Generated Content (with the exception of recordings) generated through your Account by any Child Users so long as the publication cannot be used to particularly identify such Child Users.
Anomaly Learning does not knowingly collect or store any personal information from or about children under the age of 13. We will delete such information if we become aware that it has been submitted through our website.
By posting Content on or through the Service, You represent and warrant that: (i) the Content is yours (you own it) and/or you have the right to use it and the right to grant us the rights and license as provided in these Terms, and (ii) that the posting of your Content on or through the Service does not violate the privacy rights, publicity rights, copyrights, contract rights or any other rights of any person or entity. We reServe the right to terminate the account of anyone found to be infringing on a copyright.
You retain any and all of your rights to any Content you submit, post or display on or through the Service and you are responsible for protecting those rights. We take no responsibility and assume no liability for Content you or any third party posts on or through the Service. However, by posting Content using the Service you grant us the right and license to use, modify, publicly perform, publicly display, reproduce, and distribute such Content on and through the Service. You agree that this license includes the right for us to make your Content available to other users of the Service, who may also use your Content subject to these Terms.
Anomaly Studios, LLC has the right but not the obligation to monitor and edit all Content provided by users.
In addition, Content found on or through this Service are the property of Anomaly Studios, LLC or used with permission. You may not distribute, modify, transmit, reuse, download, repost, copy, or use said Content, whether in whole or in part, for commercial purposes or for personal gain, without express advance written permission from us.
The Services are backed by our Child Safe Guarantee. This means that accounts will never include any pop-up ads or other advertisements directed to children.
When you create an account with us, you guarantee that you are above the age of 18, and that the information you provide us is accurate, complete, and current at all times. (For educational institutions, see below for student accounts). Inaccurate, incomplete, or obsolete information may result in the immediate termination of your account on the Service.
You are responsible for maintaining the confidentiality of your account and password, including but not limited to the restriction of access to your computer and/or account. You agree to accept responsibility for any and all activities or actions that occur under your account and/or password, whether your password is with our Service or a third-party service. You must notify us immediately upon becoming aware of any breach of security or unauthorized use of your account.
You may not use as a username the name of another person or entity or that is not lawfully available for use, a name or trademark that is subject to any rights of another person or entity other than you, without appropriate authorization. You may not use as a username any name that is offensive, vulgar or obscene.
We reServe the right to refuse service, terminate accounts, remove or edit content, or cancel orders in our sole discretion.
You need an account for most activities on our platform, including to purchase and enroll in a course or to submit a course for publication. When setting up and maintaining your account, you must provide and continue to provide accurate and complete information, including a valid email address. You will also be asked to provide a password in connection with you account.
You may register for an account to use our services by using an email account only if certain conditions below apply:
1. You are a student with a personal email account you want to use for our services and you are either:
a. 18 years old or older or
b. Have consent from your parents or legal guardian to have one and use it for our services.
2. You are a student that would like to use your legal parent's email account and has consent from your legal parent to do so.
3. You are a school or school representative that has provided email accounts to students and has permission from the student's parent's or legal guardians to use the service. You must be a teacher or school administrator or otherwise authorized by a school or district to sign up on behalf of students.
If you are a school, district, or teacher, you represent and warrant that you are solely responsible for complying with COPPA, meaning that you must obtain advance written consent from all parents or guardians whose children under 13 will be accessing the Services. When obtaining consent, you must provide parents and guardians with these Terms and our Privacy Policy. You must keep all consents on file and provide them to us if we request them. If you are a teacher, you represent and warrant that you have permission and authorization from your school and/or district to use the Services as part of your curriculum, and for purposes of COPPA compliance, you represent and warrant that you are entering into these Terms on behalf of your school and/or district.
You represent and warrant that you are of legal age to form a binding contract (or if not, you've received your parent's or guardian's permission to use the Services and gotten your parent or guardian to agree to these Terms on your behalf, as we described earlier, and also to agree to these Terms and their own behalf). If you're agreeing to these Terms on behalf of an organization or entity (for example, if you're an administrator agreeing to these Terms on behalf of your district), you represent and warrant that you are authorized to agree to these Terms on that organization or entity's behalf and bind them to these Terms. You also certify that you are legally permitted to use and access the Services and take full responsibility for the selection and use of and access to the Services. This Agreement is void where prohibited by law, and the right to access the Services is revoked in such jurisdictions.
If you register, approve the registration of, or otherwise assume responsibility for any child user, you represent and warrant that you are such child user's legal parent or guardian and you agree to be bound by the terms on behalf of such child user, including without limitation being liable for all use of the website by the child user. You acknowledge that Anomaly Learning may choose, but is not obligated, to make any inquiries, either directly or through third parties, that Anomaly Learning deems necessary to validate your registration information, including without limitation engaging third parties to provide verification services. Anomaly Learning reServes all rights to take legal actions against anyone who misrepresents personal information or is otherwise untruthful about their identity. Notwithstanding the foregoing, you acknowledge that Anomaly Learning cannot guarantee the accuracy of any information submitted by any user and Anomaly Learning is not obligated to verify the identity of any user, including any user's claim to be a parent user, or to verify that a parent identified by a child user or a teacher during registration is such child user's actual parent or guardian. A parent user account, along with all associated child user accounts, may be terminated by Anomaly Learning at any time and without warning for any failure to abide by these terms.
You are responsible for maintaining the confidentiality of your account and password, including but not limited to the restriction of access to your computer and/or account. You agree to accept responsibility for any and all activities or actions that occur under your account and/or password, including your disclosure of your personally identifiable information or the personally identifiable information of the child you are giving consent to use our services, whether your password is with our Service or a third-party service. You must notify us immediately upon becoming aware of any breach of security or unauthorized use of your account.
We are committed to protecting your privacy, and has developed our privacy practices to align with applicable laws, including the Family Educational Rights and Privacy Act (FERPA) and the Children's Online Privacy Protection Act (COPPA).
You may not use as a username the name of another person or entity or that is not lawfully available for use, a name or trademark that is subject to any rights of another person or entity other than you, without appropriate authorization. You may not use as a username any name that is offensive, vulgar or obscene.
We reServe the right to refuse service, terminate accounts, remove or edit content, or cancel orders in our sole discretion.
We respect the intellectual property rights of others. It is our policy to respond to any claim that Content posted on the Service infringes on the copyright or other intellectual property rights ("Infringement") of any person or entity.
If you are a copyright owner, or authorized on behalf of one, and you believe that the copyrighted work has been copied in a way that constitutes copyright infringement, please submit your claim via email to support@anomalystudios.com, with the subject line: "Copyright Infringement" and include in your claim a detailed description of the alleged Infringement as detailed below, under "DMCA Notice and Procedure for Copyright Infringement Claims"
You may be held accountable for damages (including costs and attorneys' fees) for misrepresentation or bad-faith claims on the infringement of any Content found on and/or through the Service on your copyright.
You may submit a notification pursuant to the Digital Millennium Copyright Act (DMCA) by providing our Copyright Agent with the following information in writing (see 17 U.S.C 512(c)(3) for further detail):
â— an electronic or physical signature of the person authorized to act on behalf of the owner of the copyright's interest;
â— a description of the copyrighted work that you claim has been infringed, including the URL (i.e., web page address) of the location where the copyrighted work exists or a copy of the copyrighted work;
â— identification of the URL or other specific location on the Service where the material that you claim is infringing is located;
â— your address, telephone number, and email address;
â— a statement by you that you have a good faith belief that the disputed use is not authorized by the copyright owner, its agent, or the law;
â— a statement by you, made under penalty of perjury, that the above information in your notice is accurate and that you are the copyright owner or authorized to act on the copyright owner's behalf.
You can contact our Copyright Agent via email at support@anomalystudios.com
The Service and its original content (excluding Content provided by users), features and functionality are and will remain the exclusive property of Anomaly Studios, LLC and its licensors. The Service is protected by copyright, trademark, and other laws of both the United States and foreign countries. Our trademarks and trade dress may not be used in connection with any product or service without the prior written consent of Anomaly Studios, LLC.
Our Service may contain links to third party web sites or services that are not owned or controlled by Anomaly Studios, LLC. Our Service may contain links to other sites that are not operated by us. If you click on a third party link, you will be directed to that third party's site. We strongly advise you to review the Privacy Policy of every site you visit. We have no control over and assume no responsibility for the content, privacy policies or practices of any third party sites or services.
Anomaly Studios, LLC has no control over, and assumes no responsibility for the content, privacy policies, or practices of any third party web sites or services. We do not warrant the offerings of any of these entities/individuals or their websites.
You acknowledge and agree that Anomaly Studios, LLC shall not be responsible or liable, directly or indirectly, for any damage or loss caused or alleged to be caused by or in connection with use of or reliance on any such content, goods or services available on or through any such third party web sites or services.
We strongly advise you to read the terms and conditions and privacy policies of any third party web sites or services that you visit.
We may terminate or suspend your account and bar access to the Service immediately, without prior notice or liability, under our sole discretion, for any reason whatsoever and without limitation, including but not limited to a breach of the Terms.
If you wish to terminate your account, you may simply discontinue using the Service.
All provisions of the Terms which by their nature should survive termination shall survive termination, including, without limitation, ownership provisions, warranty disclaimers, indemnity and limitations of liability.
You agree to defend, indemnify and hold harmless Anomaly Studios, LLC and its licensee and licensors, and their employees, contractors, agents, officers and directors, from and against any and all claims, damages, obligations, losses, liabilities, costs or debt, and expenses (including but not limited to attorney's fees), resulting from or arising out of a) your use and access of the Service, by you or any person using your account and password; b) a breach of these Terms, or c) Content posted on the Service.
In no event shall Anomaly Studios, LLC, nor its directors, employees, partners, agents, suppliers, or affiliates, be liable for any indirect, incidental, special, consequential or punitive damages, including without limitation, loss of profits, data, use, goodwill, or other intangible losses, resulting from (i) your access to or use of or inability to access or use the Service; (ii) any conduct or content of any third party on the Service; (iii) any content obtained from the Service; and (iv) unauthorized access, use or alteration of your transmissions or content, whether based on warranty, contract, tort (including negligence) or any other legal theory, whether or not we have been informed of the possibility of such damage, and even if a remedy set forth herein is found to have failed of its essential purpose.
Your use of the Service is at your sole risk. The Service is provided on an "AS IS" and "AS AVAILABLE" basis. The Service is provided without warranties of any kind, whether express or implied, including, but not limited to, implied warranties of merchantability, fitness for a particular purpose, non-infringement or course of performance.
Anomaly Studios, LLC and its subsidiaries, affiliates, and its licensors do not warrant that a) the Service will function uninterrupted, secure or available at any particular time or location; b) any errors or defects will be corrected; c) the Service is free of viruses or other harmful components; or d) the results of using the Service will meet your requirements.
Some jurisdictions do not allow the exclusion of certain warranties or the exclusion or limitation of liability for consequential or incidental damages, so the limitations above may not apply to you.
These Terms shall be governed and construed in accordance with the laws of Tennessee, United States, without regard to its conflict of law provisions.
Our failure to enforce any right or provision of these Terms will not be considered a waiver of those rights. If any provision of these Terms is held to be invalid or unenforceable by a court, the remaining provisions of these Terms will remain in effect. These Terms constitute the entire agreement between us regarding our Service, and supersede and replace any prior agreements we might have had between us regarding the Service.
We reServe the right, at our sole discretion, to modify or replace these Terms at any time. If a revision is material we will provide at least 30 days notice prior to any new terms taking effect. What constitutes a material change will be determined at our sole discretion.
By continuing to access or use our Service after any revisions become effective, you agree to be bound by the revised terms. If you do not agree to the new terms, you are no longer authorized to use the Service.
If you have any questions about these Terms, please contact us.
â— By email: support@anomalystudios.com
â— By visiting this page on our website: https://www.anomalystudios.com/terms-of-use-and-conditions
â— By mail: Anomaly Studios, LLC. P.O. Box 682592. Franklin, TN 37064
Header Images Component Tutorial
In the video above you can use the chapters menu to jump to main chapters of the video or use the time code references below to manually jump to parts of the video. The video also has searchable transcripts in the video player. These features are shown below.
If you are looking for a quick tech demo of how to integrate the Header Image Component simply start at 1:18 in the video demo above and you will get a full breakdown of the essentials in less than two minutes.
Then continue on for the remainder of the demo to get a variety of creative design strategy tips and techniques to help provide a world-class visual experience for your site.
The header image component provides a versatile and visually impactful way to set the tone and context for web page content. This demo will show you how header images can be used in either a fixed width or full browser width layout, allowing for creative flexibility in design.
The technical steps for using the Header Image Component are very simple and straight forward. As such, the primary focus of this demo is to show a variety of creative strategies of you can use image styles to set the tone and mood of your user experience. If you are looking for the technical steps you can jump straight to 23:10 in the video above. You will see the steps completed in just a few clicks.
This demo covers various creative strategies like using blurred images, color saturation, and logo overlays to establish the desired mood and branding. The process for implementing header images was shown to be straightforward, leveraging Photoshop templates to easily size and export assets. The demo emphasizes the importance of coordinating header imagery with body content to create a cohesive user experience. The demo highlights the power of the header image component to elevate the visual design of a website through a simple yet effective implementation.
Header Image Component Overview [0:01]
Josh Lomelino introduces the header image component, emphasizing its optional nature but noting its importance for design aesthetics and consistency.
The header image can be used for various purposes, such as Success Path diagrams, and is flexible across different form factors (mobile, tablet, desktop).
The header image can occupy either a fixed size or full screen width, adapting dynamically to the device's size.
Josh demonstrates how the header image component adjusts its size and position on different devices, including mobile and desktop.
Fixed vs. Full Width Header Images [3:21]
Josh explains the two primary ways to use the header image component: fixed width and full width.
A fixed width image is useful for Success Path diagrams, showing the user's progress through content.
The full width image spans the entire browser width, providing a dynamic and adaptive look.
Josh shows examples of both fixed and full width images, highlighting their respective uses and benefits.
Creative Strategies for Header Images [6:58]
Josh discusses various creative strategies for using header images, including blurred images, color saturation, and logo overlays.
Blurred images can set the tone and texture of the page, while color saturation can enhance the mood of different sections.
Logo overlays can be used to show product or company logos, or sub-brands within an organization.
Photographic images, including cropped photography, can create visual interest and set the stage for the content.
Implementation and Exporting Images [10:59]
Josh provides a step-by-step guide on implementing header images, including the best image sizes for full width and fixed width images.
For full width images, the recommended size is 2300 pixels wide by 240 pixels tall.
For fixed width images, the recommended size is around 1448 by 308 pixels.
Josh demonstrates how to export images from Photoshop, ensuring they are the correct size and quality for the header component.
Using Templates and Media Manager [22:49]
Josh explains the use of templates for header images, including full width and fixed width templates.
The templates are structured to allow easy drag and drop of images, with layers for different elements like logos and header images.
Josh shows how to use the media manager to upload and manage images, emphasizing the importance of consistent file organization.
He also discusses the flexibility of using open-source image editing software like GIMP and Procreate.
Coordinating Header and Body Images [36:04]
Josh demonstrates how to coordinate header images with body images to create a unified look and feel.
He explains the process of exporting and uploading images, ensuring they are the correct size and quality.
Josh highlights the importance of file naming conventions to avoid issues with Server caching.
He shows how to update and replace images in the media manager, ensuring the new images are correctly integrated into the page.
Creative Freedom and Customization [36:20]
Josh encourages users to explore different creative strategies for header images, including using stock imagery from sites like Unsplash.
He emphasizes the importance of having a clear license for any content used.
Josh demonstrates how to use different effects and adjustment layers in Photoshop to enhance the look of header images.
He shows how to create a visual content brainstorm spreadsheet to plan and organize images for different pages or classes.
Handling Image Caching and Updates [45:00]
Josh explains how to handle issues with image caching, including clearing browser cache or renaming files to force updates.
He demonstrates the process of updating and replacing images in the media manager, ensuring the new images are correctly integrated.
Josh highlights the importance of testing and refreshing the page to ensure the new images are visible.
He provides tips for managing and organizing images in the media manager to maintain consistency and efficiency.
Final Thoughts and Best Practices [49:17]
Josh summarizes the key points of the tutorial, emphasizing the flexibility and creative freedom of the header image component.
He encourages users to explore the examples and templates provided, using them as inspiration for their own designs.
Josh highlights the importance of consistent file organization and proper image sizing for optimal performance.
He concludes with a reminder to always test and refresh the page to ensure new images are correctly displayed.
Creating a Curriculum Plan End to End
Creating Engaging Curriculum Plans 0:04
Josh Lomelino introduces the process of creating curriculum plans that engage and empower students, blending accredited programs with public-facing classes.
He shares a personal anecdote about a professor's advice on being a "sage on the stage" versus a "guide on the side," emphasizing the importance of learner engagement.
Josh discusses the principles of game design and the importance of motivation in creating engaging learning experiences.
He highlights the need to align curriculum planning with the question, "What can I do with this?" to make learning meaningful and actionable.
Framework for Aligning Program and Course Outcomes 6:28
Josh introduces a framework shared by Julie Basler, the nationwide accreditation director, which aligns program and course outcomes.
He explains the triangular approach, starting with the school mission, followed by program missions, program outcomes, and finally, class competencies.
Josh emphasizes the importance of mapping these outcomes to specific class-level outcomes to create targeted and efficient courses.
He shares his experience of optimizing the workflow to create entire course plans in less than a day, significantly reducing the time and effort previously required.
Success Path Planning and Journey Mapping 20:10
Josh introduces the concept of success path planning and journey mapping, using a UX design approach to create a motivational learning experience.
He explains the stages of a learner's journey, from awareness to success, and the characteristics associated with each stage.
Josh discusses the importance of using the right verbs to describe success milestones and outcomes, aligning them with the learner's progress.
He provides an example of mapping course outcomes to specific milestones and action steps, ensuring a clear path for learners to achieve their goals.
Bloom's Taxonomy and Hierarchy of Learning 46:58
Josh introduces Bloom's Taxonomy as a framework for designing learning outcomes, outlining the different levels of learning from knowledge to evaluation.
He explains the importance of using specific verbs at each level to describe the types of learning activities and outcomes.
Josh provides a cheat sheet for Bloom's Taxonomy, listing verbs for each level to help in writing outcome statements.
He emphasizes the need to build a foundation of knowledge and comprehension before moving to higher-order thinking skills like analysis and evaluation.
Creating Course Outcomes and Mapping to Lessons 1:07:43
Josh demonstrates the process of creating course-level outcomes using Bloom's Taxonomy, starting with knowledge and moving to evaluation.
He provides examples of course outcomes and maps them to specific lessons and activities, ensuring alignment with the overall learning goals.
Josh discusses the importance of using the right verbs to describe what learners will be able to do, making the outcomes actionable and measurable.
He emphasizes the need to continuously refer back to the course outcomes to ensure that all lessons and activities support the desired learning objectives.
Curriculum Planning Matrix and Assessment Mapping 1:33:43
Josh introduces the curriculum planning matrix, a tool for mapping course outcomes to specific lessons and assessments.
He explains the structure of the matrix, including metadata, time tracking, and assessment mapping, to create a cohesive and purposeful learning experience.
Josh demonstrates how to map weekly outcomes to specific lessons and activities, ensuring that each lesson supports a clear learning objective.
He emphasizes the importance of aligning lessons with course outcomes and using the matrix to track progress and measure success.
Detailed Curriculum Planning Example 1:33:58
Josh provides a detailed example of a curriculum plan for a social media and digital marketing class, demonstrating the complete planning process.
He explains the metadata, time tracking, and assessment mapping for the class, including the total hours required and the distribution of activities.
Josh highlights the importance of aligning lessons with course outcomes and using the curriculum planning matrix to ensure a cohesive and purposeful learning experience.
He emphasizes the need to continuously review and refine the curriculum to ensure it meets the learning goals and supports the success of the learners.
Final Steps and Tools for Curriculum Planning 1:35:42
Josh summarizes the key steps in the curriculum planning process, including brainstorming phases, mapping outcomes, and creating detailed lesson plans.
He emphasizes the importance of using the right verbs and aligning lessons with course outcomes to create a motivational and engaging learning experience.
Josh provides tools and resources, including templates and cheat sheets, to help in the curriculum planning process.
He encourages continuous review and refinement of the curriculum to ensure it meets the learning goals and supports the success of the learners.
Creating a Curriculum Plan End to End 1:35:58
Josh Lomelino introduces the concept of a built-in scheduling tool for planning and deadlines.
Discussion on the use of rubrics for assessment, especially in public-facing courses.
Josh explains the assignment sheet and its role in outlining the entire assessment process.
High-level goals and outcomes are outlined, emphasizing the end-to-end planning process.
Project Scenario and Assignment Steps 1:42:58
Josh emphasizes starting with a project scenario and providing examples and rationale.
The assignment steps are flexible, ranging from 16 weeks to as short as five weeks.
Each assignment is broken down into specific steps with submission information and a rubric.
The rubric includes categories like business overview, customer avatars, competitive research, and a process book.
Grading and Accreditation Preparation 1:45:07
Josh discusses the importance of grading and rubrics for accreditation purposes.
The process involves pre-planning grading points and distinct grading categories.
External documentation is used before executing the plan within an LMS.
The document is not completed in one pass but unfolds week by week.
Success Path and Competency Development 1:47:18
Josh outlines the success path from initial unhappiness to transformation.
Focus on teaching students to develop the necessary competencies.
Thinking creatively and getting away from the computer helps in the ideation process.
Josh plans to use audio recordings to capture free-forming thoughts and ideas.
Leveraging AI for Content Creation 1:50:39
Josh explains the use of AI tools like Otter AI to transcribe audio recordings.
The transcript helps generate learning outcomes and lesson plans from the speaker's own words.
The process involves recording thoughts in sequence and combining them into a single file.
The final output provides a structured outline for content creation.
Finalizing the Curriculum Plan 2:08:57
Josh emphasizes the importance of having a clear success path with five to six phases.
The final output includes a detailed transcript and summary of ideas.
The process helps in creating targeted content that aligns with the success path.
The final matrix Serves as a knowledge base for querying and generating new ideas.
Implementing the Plan 2:12:18
Josh discusses the importance of mapping ideas to specific phases of the success path.
The process involves querying the knowledge base for lesson ideas and action items.
The final matrix includes practical tips and techniques for developing a healthy lifestyle.
The approach ensures that the curriculum is actionable and moves learners towards their goals.
Refining the Content 2:15:00
Josh plans to refine the content by focusing on specific lessons and their details.
Each lesson is dedicated to a single audio recording and subsequent transcription.
The process helps in generating detailed video scripts and lesson plans.
The final output includes a clear structure for the entire course experience.
Creating a Knowledge Base 2:22:41
Josh emphasizes the importance of creating a knowledge base for future reference.
The knowledge base includes all key steps, tools, and resources used in the process.
The approach ensures that the final curriculum is comprehensive and actionable.
The knowledge base Serves as a resource for continuous improvement and content creation.
Final Thoughts and Encouragement 2:23:38
Josh encourages participants to query their own brains and use AI tools for brainstorming.
The process helps in generating a variety of assets and content ideas.
The final matrix includes a detailed outline for the entire course experience.
The approach ensures that the curriculum is designed to help learners achieve their goals and become raving fans.
Here are strategies you can use to create engaging and motivational learning experiences for students.
Here are some key strategies Josh Lomelino discussed for creating engaging and motivational learning experiences:
Getting Started
This introductory programming session focuses on teaching beginners how to write actual computer code using an Integrated Development Environment (IDE), specifically the Processing language. Josh Lomelino emphasizes learning programming logic and algorithms by creating computer graphics, starting with building a simple character like a robot. The approach aims to provide a lightweight, accessible entry point into programming that can be applied across multiple programming languages. By starting with practical, hands-on coding, participants will learn fundamental programming concepts while creating visual, interactive projects.
Here are the key things you will be able to do after you watch this demo:
Set up and navigate an Integrated Development Environment (IDE)
Write basic computer code using the Processing programming language
Create simple computer graphics and draw characters on screen
Understand fundamental programming logic and algorithm development
Translate programming concepts across multiple coding languages
Build foundational skills in computer graphics programming
Apply logical thinking to solve computational problems
Recognize the basic structure and syntax of a programming language
Develop a beginner's understanding of how computers interpret and execute code
Create interactive visual programs from scratch
Introduction to Programming and IDEs 0:01
Josh Lomelino emphasizes the importance of taking immediate action and introduces the concept of writing computer code from the start.
He explains the need for an Integrated Development Environment (IDE) to write and run code, highlighting its versatility in supporting various programming languages.
Josh mentions several programming languages that can be used within an IDE, including Python, Java, C++, C#, Swift, JavaScript, and even C.
He stresses that the focus will be on learning logic and creating algorithms, rather than getting bogged down in the choice of specific languages.
Building a Character and Computer Graphics 2:02
Josh announces the first project: building a character, specifically a robot, which will Serve as the foundation for computer graphics.
He explains that the principles learned in this project will be applicable to various fields, from video games to animated movies.
The project aims to introduce the basics of computer graphics, which are essential for understanding more complex programming concepts.
Josh introduces the language Processing, which is based on other existing languages and will be used for the initial programming exercises.
Advantages of Processing Language 2:39
Josh highlights the benefits of using Processing, including its lightweight nature and the ability to build things quickly.
He notes that other languages may require more setup and have additional overhead, which can complicate the learning process.
Processing is chosen for its simplicity and the ease with which it can be applied to other programming languages.
The next video will cover the steps to set up an IDE and begin building logic and computer graphics programs.
Next Steps and Conclusion 3:38
Josh outlines the plan for the next video, which will focus on setting up an IDE and starting to build logic and computer graphics programs.
He reiterates the importance of understanding logic and how it can be applied to create powerful programs.
The goal is to make the computer perform cool tasks by applying logical thinking and programming concepts.
Josh concludes the session by encouraging participants to prepare for the next steps and expresses excitement for the upcoming projects.
Automated Video Production Pipeline
This video guides you through setting up an automated video production pipeline, from selecting and testing brand voices using Eleven Labs to pairing them with digital avatars in HeyGen. By following the steps, you'll learn how to catalog and integrate voices, match them with visual characters, and generate preview videos for evaluation. Once you complete the video, you'll be able to efficiently create, test, and organize multiple spokesperson options for your brand's automated content generation. This process empowers you to streamline video production and build a scalable library of branded video assets.
Following are the key things you will be able to do after you watch this demo:
Identify suitable brand voices using generative AI tools.
Catalog and organize voice and avatar options for efficient selection.
Integrate third-party voices into video production platforms.
Pair voices with digital avatars to create compelling spokesperson combinations.
Generate and preview automated video content for evaluation.
Document and track production assets for streamlined workflow.
Select and finalize top spokesperson options for automated content generation.
Introduction to Automated Video Production Pipeline (00:00:00 – 00:00:59)
Josh kicks off the demo by outlining the goal: selecting brand-aligned voices and digital doubles (either your own clone or hired actors), organizing those assets, and laying out the end-to-end steps needed to spin up a fully automated video production pipeline.
Content Sequencing Concept and Cloning (00:00:59 – 00:02:20)
He explains the core idea of building a repeatable sequence of content—cloning a finished production over and over—so you can continually generate new videos by plugging different scripts into the same automated workflow.
Defining Digital Doubles and Voice Types (00:02:20 – 00:03:11)
Josh clarifies terminology (digital twin vs. digital double), walks through the two main “buckets” of voice assets (personality-based clones vs. spokesperson avatars), and discusses how to mix and match them depending on your brand needs.
Selecting Platforms for Generative AI and Deployment (00:03:11 – 00:04:00)
He emphasizes the importance of vetting your generative-AI tools—voice engines and video avatars—and making sure they’re compatible with your target platforms before committing to any given solution.
Brand-Focused Workflow and SRT Utilization (00:04:00 – 00:05:25)
Josh decides to focus on one streamlined method for this demo, using a single SRT transcript file as the “source of truth” for automation—underscoring that a clean, well-formatted SRT is absolute gold when you’re architecting an automated pipeline.
Importing SRT and Leveraging Automation (00:05:25 – 00:07:40)
He shows how to import the SRT into the voice-generation platform, highlighting how the time-coded script drives every subsequent step—from audio rendering to scene assembly.
Setting Up Voice Design in ElevenLabs (00:07:40 – 00:11:49)
A step-by-step walkthrough of testing voice presets, tweaking text lengths, integrating third-party voices, and crafting voice-design prompts to nail down the exact tone and style you want.
Managing Credits and Reviewing Generated Audio (00:11:49 – 00:15:46)
Josh demonstrates how to monitor and conServe your generation credits, preview the rendered audio, swap out placeholder text, and ensure you’re only spending resources on polished clips.
Applying Voiceover and Text Overlays to Video (00:15:46 – 00:19:08)
He attaches the finalized voice track to the video timeline, adds and styles text overlays (centering, contrast adjustments), and assembles the basic video composition ready for export.
Enhancing Prompts with AI Tools for Voice Design (00:19:08 – 00:22:04)
Introduces additional AI utilities for brainstorming and refining your voice-design prompts—showing how to iterate until you get a sample that truly matches your brand voice.
API Key Handling and Asset Export Configuration (00:22:04 – 00:27:28)
A practical guide on securely copying your ElevenLabs API key, configuring export settings (e.g., 4K output), and organizing all generated files into branded folders for easy access.
Frame Rate Considerations and Quality Checks (00:27:28 – 00:31:42)
Notes the default 25 fps setting, explains how frame rate impacts perceived motion, and walks through checking your export quality to avoid any unexpected artifacts.
Avatar Adjustments, Project Naming, and Fallbacks (00:31:42 – 01:05:16)
Josh covers fine-tuning avatar scale and positioning, updating project names for consistency, and setting up fallback workflows if you need to swap voices or visuals mid-pipeline.
Avatar Replacement and Cataloging (00:31:42 – 00:34:06)
Pair your chosen voice with visuals by replacing the default avatar, browsing through the 21 “looks” in each category, using the snipping tool to capture promising thumbnails, and logging each candidate’s name and category in your tracking spreadsheet.
Avatar Testing and Video Formatting (00:34:07 – 00:36:24)
Brainstorm voice–visual combinations (e.g. “August”), select a portrait-mode avatar, preview the static image, upload any custom avatars into the pipeline, drag your source video beneath the avatar layer, and confirm the composition and framing.
Voice-Avatar Sync and Quality Comparison (00:36:24 – 00:37:39)
Generate audio samples to compare HeyGen vs. ElevenLabs quality, force-refresh the clip to confirm it’s using the intended voice (e.g. Ryan Kirk), and watch for the spinning indicator to verify successful render.
Preview Generation and File Labeling (00:38:10 – 00:39:11)
Render a 4K preview of the voice-avatar pairing, then label the export asset with your convention (e.g. 001_RyanKirk_CharlieAvatar) so each test remains organized and easily identifiable.
Pipeline Duplication for Variant Testing (00:39:11 – 00:41:15)
Duplicate the entire sequence to create “Test 002,” swap in a new avatar (such as Colton), explore lifestyle/UGC categories, and note how background removal and frame size affect the final look.
Background Removal and Frame Adjustments (00:41:15 – 00:42:32)
Apply the background-remover tool to avatars with built-in backgrounds, obServe any cut-offs (like arms being cropped), tweak the canvas framing, and decide between static vs. transparent backgrounds based on brand needs.
Third-Party Voice Integration Workflow (00:42:32 – 00:44:03)
In the “My Voices” tab, toggle on integrated voices (e.g. Charlie), heart your favorites so they surface first, preview each sample, and ensure the API integration is active before proceeding.
Voice Audition Labeling and Mood Board Documentation (00:44:03 – 00:47:09)
Name each audition (e.g. 002_CharlieAvatar), update your mood board with snipped thumbnails, record which browser tab or category each came from, and keep this documentation up to date for reproducibility.
Frame Rate and Credit Management (00:47:09 – 00:48:06)
Note the default 25 fps setting—mismatches can cause audio sync issues—toggle off “Avatar 4” if you’re on an unlimited plan, and monitor your generation credits to avoid unexpected limits.
Styling and Folder Organization (00:48:06 – 00:49:29)
Adjust text overlay colors to maintain contrast (match your brand palette), create new folders for each batch, and standardize your output directory structure so you know exactly where each rendered clip lives.
Option Preview and Cataloging Workflow (00:49:30 – 00:55:51)
Refresh thumbnails, scroll through voice-avatar combos, assign option numbers, screenshot grids of candidates, and log each pairing’s status (“Yes,” “Maybe,” “No”) in your spreadsheet.
Iteration Process and Consistency Notes (00:55:51 – 00:57:23)
Always regenerate every variation (never reuse stale renders), note any limitations (e.g. animated text can cover on-screen elements), and keep your naming and documentation consistent so the pipeline remains bullet-proof.
Ranking Options and Visual Separators (00:57:24 – 01:02:40)
Introduce visual separators in your catalog (e.g. blank rows), rank the top voice-avatar combos, screenshot your “definite yes” list, and preServe those as templates for future batches.
Additional Voice Integration: Amelia (01:02:40 – 01:04:33)
Search for “Amelia” in your voice library, verify whether it’s built-in or needs third-party integration, add it to favorites, preview the sample, and record its ID for consistent reuse.
Final Voice Candidate Integration (01:04:33 – 01:05:16)
Confirm Amelia’s render, then search for any last candidates (e.g. “Analore”), heart and test them, catalog the results, and ensure each new voice is fully integrated into the pipeline.
Final Pipeline Recap and Scale Duplication (01:07:40 – 01:08:34)
Recap how you’ve selected your final set of voices and avatars, finalize your naming conventions, and highlight that you can now duplicate this entire automated workflow to churn out an endless library of on-brand social-media videos.
Planning the Big View
The video introduces the concept of setting up a "home base" for your online business using AMP. This home base will include a main website, blog, lead magnets, online memberships, and capabilities for internal and external training. The goal is to provide a comprehensive platform where you can manage all aspects of your online presence and activities without needing to code.
Here are the key things you will be able to do after you watch this demo:
Plan the information architecture and site map for your home base website.
Implement a main marketing website, blog, and lead magnets using AMP.
Manage unlimited online memberships, courses, and subscription options within AMP.
Develop internal company training and external customer training programs on your AMP platform.
Integrate sales and marketing funnels into your AMP-powered home base.
Consolidate your online business activities into a single, code-free platform.
Setting Up Home Base and Information Architecture (0:00)
Josh Lomelino introduces the concept of launching a website and the importance of having a clear information architecture.
The main website will include key information, marketing messages, and contact details.
Josh mentions the possibility of consolidating various online elements like blogs and marketing sites into one central location.
The goal is to use AMP to manage all online business activities efficiently.
Components of Home Base (2:16)
Josh explains that home base will include the main website and a blog.
The blog will feature unlimited articles to attract traffic and address specific pain points.
Lead magnets, such as free resources, training, and digital downloads, can be used to drive traffic to the site.
Online memberships, both free and paid, can be managed through AMP, offering various classes and subscription models.
Handling Internal and External Training (3:29)
Josh discusses the need for internal company training and external customer training.
A knowledge base is essential for providing key information and support.
AMP allows for the management of multiple memberships and classes, including one-time payments and ongoing subscriptions.
The platform supports a variety of training needs, from company training to customer training.
Sales and Marketing Integration (4:33)
Josh emphasizes the importance of integrating sales and marketing within AMP.
Marketing funnels are crucial for converting incoming traffic into sales.
Home base Serves as the central operating system for all business activities, including digital and physical products.
The goal is to handle everything from company training to customer-facing training without the need for coding.
Planning and Organizing Content (6:35)
Josh outlines the process of planning and organizing the site, starting with a minimum viable product (MVP).
The next video will cover the basics of building a site map and thinking about the site's vision.
The approach will be incremental, starting small and building up from there.
The ultimate goal is to have a clear plan for content organization, implementation, and growth.
Creating your first page
This demo teaches you how to quickly and easily create your first page within the CMS system. You will learn how to set up the page, including configuring the URL, description, and keywords for optimal SEO. The demo also shows you how to effortlessly add and format content, with the system automatically generating the necessary HTML tags. Finally, you will discover how to manage and modify your pages, as well as organize your content using a category-based system, empowering you to scale your website with thousands of pages.
Here are the key things you will be able to do after you watch this demo:
Log in to the CMS
Create a new content page with the title "About Us"
Specify the URL for the "About Us" page
Add a description and keywords for the "About Us" page
Enter content for the "About Us" page
ObServe the automatic formatting of the content
Modify the "About Us" page content as needed
Change the URL for the "About Us" page if required
Add a link to the "About Us" page in the site map documentation
Categorize content for better organization and management
Manage large amounts of content using the centralized database
Introduction and Initial Setup (0:00 - 0:30)
Explains the purpose of the demo: teaching how to create the first page
Mentions the importance of earlier steps like creating information architecture diagrams
Introduces the example pages: home, about, services, and products
URL and Description Configuration (0:30 - 1:30)
Discusses the importance of the URL for SEO and indexing
Recommends using dashes between words for better search engine visibility
Explains the flexibility of the URL and the necessity of a description for SEO
Mentions the use of keywords, both manually added and through a keyword module, and their role in SEO
Notes that advanced settings will be customized later, focusing on the basic configuration
Content Entry and Formatting (1:30 - 2:30)
Demonstrates entering content into the "about us" page
Emphasizes the ease of copying and pasting from various sources like Word or Google Docs
Highlights the automatic formatting of HTML tags for clean and well-structured code
Explains the use of semantic tags for bolding, italicizing, and other formatting
Shows how to submit the content to the database and refresh the page to see the updated content
Advanced Features and URL Management (2:30 - 3:30)
Introduces advanced features like creating headers, branding images, and integrating various media types
Explains the process of modifying and deleting pages, using the "about us" page as an example
Discusses the importance of managing URLs, including changing URLs and the potential need to relink pages
Mentions the use of related link modules for automatic URL updates and the simplicity of changing URLs without creating new records
Content Management and Categorization (3:30 - 4:30)
Demonstrates linking pages within the site map for easy navigation and content management
Explains the concept of a category-based system for managing large amounts of content
Highlights the centralized database for easy content updates and the ability to categorize content
Concludes the demo by summarizing the process of creating, viewing, and publishing the first page online, emphasizing the scalability of the system
The Content Hub and Nucleus
The key takeaway from Josh Lomelino's demo is the ability to create and manage content at scale using the AMP platform. Learners will be able to implement a centralized content engine that Serves as the nucleus for their digital ecosystem, seamlessly connecting various content types like main sites, blogs, and online courses. Additionally, they will learn to leverage AMP's automatic organization and navigation features to simplify the process of building a comprehensive and user-friendly digital presence, saving time and effort. By the end of the demo, learners will be equipped with the skills to efficiently create, modify, and manage all their content within the intuitive AMP interface.
Here are the key things you will be able to do after you watch this demo:
Implement the content engine as the core of the AMP platform to create and manage various types of content (main site, blog, courses, etc.) in a centralized and interconnected way.
Establish connections and links between different content items to enable seamless navigation for users.
Leverage AMP's automatic organization and management of complex content structures with thousands of items, simplifying the process of building a comprehensive digital presence.
Create content for online memberships, courses, and classes, and utilize AMP's automatic generation of navigation and structure.
Utilize the user-friendly AMP interface to efficiently perform all content creation, modification, and management in one place.
Optimize the time-saving and scalable nature of the AMP platform to build and maintain a robust digital ecosystem with ease.
Content Creation and Navigation in AMP (0:10)
Josh Lomelino introduces the concept of creating content at scale using AMP, emphasizing its efficiency and ease.
The content engine is described as the nucleus of the system, facilitating navigation between various pages.
Josh explains the vision of connecting content items, drawing a parallel to Tim Berners-Lee's work in HTML.
The system allows for the creation of connections between content items, making it easier to manage complex content structures.
Handling Multiple Content Types and Traffic Sources (2:12)
Josh discusses the integration of different content types, such as a main site, blog, and courses.
He highlights the importance of managing traffic from various sources like Facebook, Instagram, and Google search.
The system automatically connects users from blog items to relevant areas on the main site or store.
Josh mentions the potential for creating courses or memberships, expanding the content universe.
Automatic Content Organization and Navigation (4:56)
Josh describes how AMP can handle the organization of thousands of content items automatically.
The system aims to simplify the process of building the digital future of a business by managing content flow.
AMP's no-code, auto-generation of HTML and other page elements is highlighted as a key feature.
The content engine will automatically build navigation and organize content for online classes and memberships.
Content Engine as the Core of AMP (6:51)
Josh emphasizes the central role of the content engine in AMP, describing it as the core of the system.
The content engine can house various types of content, including main site, blog, and course content.
The system manages links between pages, making it easy to associate related content.
Josh demonstrates the ease of managing content through a user-friendly interface.
Implementing and Managing Content with AMP (8:04)
Josh explains that all content management, including creation and modification, happens within the AMP interface.
The system is designed to handle complex content structures with ease.
Josh promises to show every step needed to master the content workflow in the following sections.
The focus is on making content management fast and efficient for users of all scales.
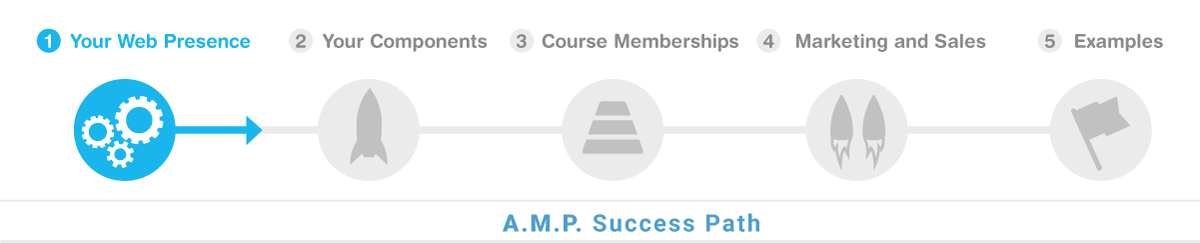
Your DNS
This video provides a comprehensive guide on how to set up DNS and SSL/TLS configurations for a website using Cloudflare. By following the steps demonstrated, viewers will be able to configure the necessary DNS records, including an A record and a CNAME record, to properly direct traffic to the origin Server and leverage Cloudflare's security features. These techniques can be applied to another CDN (content delivery network) if you are not using cloudflare.
Here are the key things you will be able to do after you watch this demo:
Configure DNS records, including an A record and a CNAME record, to direct traffic to the origin Server.
Explain the purpose and benefits of enabling the "proxied" setting for DNS records to enhance security.
Differentiate between the various SSL/TLS encryption mode options (full, flexible, strict) and apply the appropriate configuration to establish a secure connection.
Evaluate SSL connections by interpreting browser security indicators and certificate details.
Recognize the option to use a custom SSL certificate branded to the domain and describe the process to deploy it on both the Cloudflare edge Server and the origin Server.
Collaborate with Cloudflare support to set up advanced SSL certificate configurations for specific use cases.
Demonstrate the overall process of setting up DNS and SSL/TLS for a website, including the necessary steps and considerations to ensure a secure and reliable connection.
Troubleshoot and resolve any issues that may arise during the DNS and SSL/TLS setup process.
Communicate the technical details and benefits of the implemented DNS and SSL/TLS configurations to stakeholders.
Apply the knowledge gained from this demo to set up secure and reliable web infrastructure for future projects.
Cloudflare DNS Setup Instructions (0:02)
Josh Lomelino explains the need to create two records: an A record and a CNAME record to direct traffic to the anomaly amp Server.
The A record should have the website name as the host and the provided IP address as the value.
Proxied should be turned on to hide the origin Server's IP address, making the connection more secure.
The A record should be saved after entering the IP address.
Adding the CNAME Record (2:09)
Josh Lomelino instructs to add a CNAME record with the host set to www and the value set to the website name (e.g., www.createmedia.com).
The CNAME record ensures that www.websitename.com redirects to the main website and supports SSL.
Proxied status should be set to cloak the origin Server's IP address.
The CNAME record configuration ensures that SSL is enabled for www subdomains.
Configuring SSL Settings in Cloudflare (3:21)
Josh Lomelino discusses the SSL/TLS encryption mode options: full, flexible, and strict.
Full mode ensures an SSL certificate between the user and Cloudflare, and between Cloudflare and the origin Server.
Flexible mode allows SSL between the user and Cloudflare but not between Cloudflare and the origin Server.
Strict mode provides the strongest SSL connection but requires testing to ensure full mode is working first.
Testing and Troubleshooting SSL Connections (6:20)
Josh Lomelino explains the process of testing SSL connections by checking the browser's security icon.
The security icon indicates whether the connection is secure and provides details about the SSL certificate.
Users can check if they are using a shared certificate or a custom certificate branded with their domain.
Most users won't need to drill down to the certificate details, but the techniques shown cover most use cases.
Advanced SSL Certificate Management (6:40)
Josh Lomelino mentions the option to purchase a custom SSL certificate for the Edge Server.
High-end experiences may require deploying a custom certificate to the origin Server.
Advanced support may be needed to install the custom certificate on the origin Server.
Most cases don't require a custom certificate, but the option is available for enhanced security.
Final Steps and Troubleshooting Tips (8:54)
Josh Lomelino summarizes the DNS and SSL setup process, ensuring a working SSL certificate between the user and Cloudflare.
The final step is to test the setup in the browser to ensure the SSL connection is secure.
Users can check the certificate details to verify the SSL configuration.
Josh Lomelino offers to answer any questions and encourages users to reach out for further assistance.
File and Media Manager
The File Manager demo showcases a powerful tool for efficiently organizing and managing files of various types, including images, PDFs, and ZIP archives. Users will learn how to mirror their local file structure on the Server, upload files using drag-and-drop or the upload button, and seamlessly integrate these files into web content. The demo also highlights advanced features such as image editing capabilities, folder management options, and direct file insertion into pages, empowering users to streamline their content creation and file organization workflows.
Here are the key things you will be able to do after you watch this demo:
Organize files and folders efficiently using the File Manager
Mirror local file structure on the Server using drag-and-drop
Integrate various file types (images, PDFs, ZIP files) into web pages
Create a hierarchical folder structure for long-term scalability and accessibility
Upload files to the Server using drag-and-drop or the upload button
Insert images into web content using the File Manager integration
Add alternate descriptions to images for improved accessibility
Link files (PDFs, ZIP archives) for users to download
Edit images directly within the File Manager using advanced tools
Save frequently accessed folders as favorites for quicker navigation
Manage folders at scale, including renaming, downloading, and zipping
Directly insert files into web content using the Insert File button
File Manager Overview and Initial Setup (0:08)
Josh Lomelino introduces the File Manager component, emphasizing its power to organize files efficiently.
The File Manager allows users to mirror their local file structure on the Server using drag-and-drop functionality.
Josh demonstrates the interface, showing various file types like images and PDFs that can be integrated into pages.
The File Manager is accessed through the CMS under Content Management, opening in a full-screen view for easy navigation.
Organizing Files and Folders (1:49)
Josh explains the importance of organizing files hierarchically for long-term accessibility and structure.
He creates a folder structure for assets, classes, and subfolders for headers and sliders.
Drag-and-drop functionality is used to upload images from the local file system to the Server.
Josh advises against using spaces in folder names to avoid special characters in URLs.
Inserting and Managing Images (5:59)
Josh shows how to insert images into content pages using the Insert Image button.
The file structure in the File Manager is mirrored in the content management interface for easy file selection.
Drag-and-drop functionality is also available when editing content, making it flexible and efficient.
Josh emphasizes the importance of using alternate descriptions for images to improve accessibility.
Linking Files for Downloads (9:26)
Josh demonstrates how to link files for downloads, such as PDFs, by selecting text and inserting a link.
He suggests organizing files in high-level folders like classes or PDFs for better scalability.
The process involves browsing for the file in the File Manager and inserting the link into the content.
Josh highlights the importance of a clear folder structure to avoid reorganization later.
Handling ZIP Files (12:49)
Josh explains how to create and manage ZIP files using the File Manager.
He demonstrates compressing a collection of files and folders into a ZIP file on a PC.
The ZIP file can be uploaded and managed in the File Manager, with folders created for scalability.
Josh shows how to insert a link to the ZIP file in content pages, allowing users to download the file.
Advanced Image Editing Features (16:35)
Josh introduces the image editing tools available in the File Manager, including resizing, cropping, and adjusting brightness and contrast.
He demonstrates applying multiple operations to an image and saving the changes.
The File Manager supports various image editing features similar to Photoshop, making it easy to manage images without external software.
Josh highlights the ability to save favorites for frequently accessed folders to save time.
Advanced File Management Features (20:03)
Josh explains advanced options for managing folders, such as renaming, downloading, and zipping entire folders.
He demonstrates how to remove files or folders if needed.
The File Manager allows users to rename files and folders directly from the interface.
Josh mentions the Video Manager, which will be covered in another session, for managing video files at scale.
Inserting Files Directly into Content (21:34)
Josh introduces the Insert File button at the bottom of the toolbar for quickly inserting files into content.
This method allows users to place files without typing descriptive text first.
The inserted file name and link can be edited later for customization.
Josh emphasizes the flexibility of the File Manager in managing various file types and integrating them into content.
Related Link Network Component
The video demonstrates how to use the related link network feature in AMP to create powerful connections between content items. Viewers will learn to quickly and easily add related links, both internal and external, to any content page, allowing users to navigate the content in a seamless and flexible manner. The video also highlights advanced features like bi-directional linking and filtered search, empowering users to manage and organize their content knowledge base with minimal effort. By the end of the video, viewers will be able to leverage the related link network to enhance the discoverability and user experience of their content.
Explain the concept of related links and their importance in enhancing learning and knowledge building.
Identify the issue of isolated content in many learning systems and the need for creating meaningful connections between ideas.
Describe the use of a sequence of content as a method to create relationships between content items.
Demonstrate the ability to create a related link network, a user interface that visualizes the connections between content.
Utilize AMP's related link network feature to quickly and easily create complex related link structures with minimal effort.
Apply the flexibility of the related link network to create both sequential and asynchronous content paths.
Implement the process of adding related links, including internal and external resources, to a content page.
Manage and reorganize related links to ensure a clean and easy-to-navigate user interface.
Leverage the advanced features of the related link network, such as bi-directional linking and filtered search, to enhance the organization and discoverability of content.
Modify and update related links, including changing titles and URLs, and obServe the real-time updates to the user interface.
Keywords: Overview, Demo, Audio, Recording, Process, Tracks, Methods, Production, Manual, AI, Generated, Voices, Automatically, Instructional, Aid, Synthesizing, Information, Guide, Instruct, Persuade, Sales, Potential, Catalyst, Automating, Content, Creation, Recorded, Serve, Presentation, Slides, PowerPoint, Canva, Animated, Effects, Virtual, Camera, Overlay, Automated, Execute, Fundamentals, Vocal, Performance, Techniques, Apply, Screen, Captures, Principles
This video provides a comprehensive overview of audio production techniques, teaching viewers how to create powerful audio tracks through manual recording and AI-generated voices. Participants will learn to leverage audio as a versatile tool for instructional content, sales support, and multimedia creation, including automated slide generation and virtual presentations. The demonstration will equip learners with fundamental vocal performance skills applicable to screen captures, on-camera presentations, and various content creation scenarios. By mastering these techniques, viewers can transform their approach to creating engaging, professional-quality audio and visual content.
This video provides a comprehensive overview of audio production techniques, teaching viewers how to create powerful audio tracks through manual recording and AI-generated voices. Participants will learn to leverage audio as a versatile tool for instructional content, sales support, and multimedia creation, including automated slide generation and virtual presentations. The demonstration will equip learners with fundamental vocal performance skills applicable to screen captures, on-camera presentations, and various content creation scenarios. By mastering these techniques, viewers can transform their approach to creating engaging, professional-quality audio and visual content.
Here are the key things you will be able to do after you watch this demo:
Record high-quality audio tracks manually
Generate AI-powered voice narrations from text scripts
Use audio as an instructional and persuasive communication tool
Automate presentation slide creation using audio tracks
Create virtual on-camera presentations with overlaid audio
Apply vocal performance techniques to screen captures
Synthesize information effectively through audio narration
Leverage audio for sales and instructional content development
Transform text scripts into multimedia presentations
Develop professional-grade content using both manual and AI-driven audio production methods
Overview of Audio Recording Process 0:08
Josh Lomelino introduces the demo, focusing on the process of recording audio tracks.
He mentions that the overview video will demonstrate two methods for audio production: manual recording and AI-generated voices.
The video aims to outline various uses of audio, emphasizing its role as an instructional aid and its potential in automating content creation.
Josh highlights that audio can synthesize information to guide, instruct, persuade, and support sales.
Applications of Audio in Content Creation 0:51
Josh explains that audio tracks can be used directly as instructional aids, providing guidance and support.
He elaborates on audio's role in automating multiple aspects of content creation, whether recorded manually or generated with AI.
An audio track can create presentation slides in applications like PowerPoint or Canva, complete with animated effects.
The audio can also be used to generate virtual on-camera presentations that overlay on automated slides.
Upcoming Demos and Techniques 1:40
Josh mentions that upcoming demos will show how to execute both methods of audio production: manual recording and AI-generated voice production.
He emphasizes the importance of mastering the fundamentals of delivering a strong vocal performance.
These techniques can be applied to various areas, including live screen captures and on-camera presentations.
Josh concludes the high-level overview, stating that he will see the audience in the next video.
Keywords: audio,recording,microphone,quality,live,studio,interface,phantom,power,sample,rate,uncompressed,format,pop,filter,level,balancing,Camtasia,Studio,file,organization,voice,clone,AI,avatar,sound,absorption
This video provides a comprehensive guide to professional audio recording for content creators, focusing on essential equipment and techniques for high-quality sound production. Viewers will learn how to select the right microphone, set up a proper recording environment, and use audio interfaces and editing tools to capture clean, professional-grade audio. By following Josh Lomelino's expert advice, participants will be able to create polished audio recordings suitable for workshops, demos, podcasts, and even AI-generated video content. The tutorial equips creators with practical skills to improve their audio recording process and produce more engaging, professional-sounding content.
This video provides a comprehensive guide to professional audio recording for content creators, focusing on essential equipment and techniques for high-quality sound production. Viewers will learn how to select the right microphone, set up a proper recording environment, and use audio interfaces and editing tools to capture clean, professional-grade audio. By following Josh Lomelino's expert advice, participants will be able to create polished audio recordings suitable for workshops, demos, podcasts, and even AI-generated video content. The tutorial equips creators with practical skills to improve their audio recording process and produce more engaging, professional-sounding content.
Here are the key things you will be able to do after you watch this demo:
Select an appropriate high-quality microphone for professional audio recording
Set up a clean, noise-free recording environment
Configure audio interfaces and software for optimal sound capture
Choose the correct sample rate and recording format
Use a pop filter and mic positioning techniques to improve audio quality
Perform audio test recordings and evaluate sound levels
Utilize audio editing tools for recording and post-production
Implement file organization strategies for audio projects
Export audio files in various formats for different content needs
Create consistent, professional-grade audio recordings for workshops, demos, and presentations
Prepare audio recordings for potential AI avatar or voice clone generation
Troubleshoot common audio recording and equipment setup challenges
Basic Method of Production 0:09
Josh Lomelino explains the simplicity and power of recording thoughts and ideas using just a microphone.
Live recordings during workshops or demos are more engaging but harder to edit if mistakes are made.
Studio recordings allow for pauses and polished takes but require maintaining a natural and conversational tone.
The importance of a high-quality microphone and a quiet, clean recording space is emphasized.
Microphone Setup and Recording Quality 1:31
Josh recommends the AKG condenser mic for its clean, detailed sound, which requires phantom power.
The Shure 57 microphone is mentioned as a versatile option for various recording situations.
The Zoom H6 USB audio interface is preferred for its compatibility with various software like Camtasia.
Recording at 48,000 Hz instead of the default 44.1 Hz is suggested to preServe audio detail.
Audio Recording Practices 3:18
Josh advises recording in an uncompressed format like WAV until the final export to avoid audio degradation.
Ensuring the computer and audio interface are set to the same sample rate prevents speed mismatches.
The use of a pop filter and an adjustable mic arm helps maintain consistent audio quality.
Test recordings and listening on different devices help ensure balanced sound levels.
Audio Editing and Tools 4:53
Josh mentions various audio editing tools like Audacity, Adobe Audition, Pro Tools, and FL Studio.
Camtasia Studio is recommended for its convenience in recording and managing audio projects.
The Auto Normalize feature in Camtasia helps maintain consistent volume throughout recordings.
Exporting recordings as MP3s allows for generating on-camera videos using AI avatars.
File Organization and Studio Setup 5:55
A consistent naming system for recordings and exports is crucial for easy retrieval and updates.
Avoiding rooms with echo and using soft materials to absorb sound helps improve recording quality.
A good studio setup, including soundproofing and proper equipment, is essential for high-quality recordings.
Josh hints at a future demo on creating a voice clone, which requires clean and consistent audio recordings.
Keywords: batch, avatar, digital-double, production, lighting, setup, color, correction, video, editing, project, HeyGen, encoder
In this tutorial, Josh Lomelino demonstrates a comprehensive workflow for efficiently batch producing multiple virtual avatars with consistent lighting and color quality. Viewers will learn how to set up precise video editing project settings, create a master sequence with multiple camera angles, and use Adobe Media Encoder to render individual clips for avatar training. The technique allows content creators to scale their avatar production, quickly export multiple versions of their digital doubles, and maintain a well-organized project structure that enables future edits and refinements. By following this method, users can streamline their avatar creation process, saving significant time and producing high-quality, professional virtual representations.
In this tutorial, Josh Lomelino demonstrates a comprehensive workflow for efficiently batch producing multiple virtual avatars with consistent lighting and color quality. Viewers will learn how to set up precise video editing project settings, create a master sequence with multiple camera angles, and use Adobe Media Encoder to render individual clips for avatar training. The technique allows content creators to scale their avatar production, quickly export multiple versions of their digital doubles, and maintain a well-organized project structure that enables future edits and refinements. By following this method, users can streamline their avatar creation process, saving significant time and producing high-quality, professional virtual representations.
Following are the key things you will be able to do after you watch this demo:
Configure video editing project settings to match camera specifications
Create a systematic numbering and organization system for avatar sequences
Set up multiple camera angles within a single project
Use Adobe Media Encoder to batch render avatar clips
Export individual video files for virtual avatar training
Implement color correction and LUT modifications across multiple clips
Organize project files for efficient content production
Develop a scalable workflow for mass avatar creation
Troubleshoot and remove performance anomalies in avatar recordings
Back up and preServe digital asset production files
Setting Up Lighting and Color Values 0:08
Josh Lomelino explains the importance of setting up lighting and color values once to achieve consistent results over time.
He emphasizes the need to test lighting and color values before batch producing a group of avatars.
Josh mentions the flexibility to make further adjustments later using L, U, T color modifications or color correction tools.
The workflow allows for the efficient production of 10 to 50 avatars, ensuring visual polish from the start.
Consistency in Project Settings 1:42
Josh highlights the necessity of matching video editing project settings to the specifications of the recording camera.
He provides an example of setting up a project for a Logitech 4k camera and ensuring consistency in frame size and frame rate.
Josh advises checking file properties to extract frame size and frame rate if unsure.
Consistency in project settings is crucial for mass producing different clips.
Creating a Master Sequence 2:59
Josh sets up a master sequence to Serve as a template for duplicating sequences as needed.
He uses a clear numbering system for sequences, labeling each avatar with a specific outfit and camera angle.
Examples include Avatar 001, DIRECT address, no hands, and Avatar 0013, quarter view.
Josh organizes sequences in a dedicated folder called a bin for project organization.
Batch Rendering with Adobe Media Encoder 4:56
Josh explains the process of adding clips to a Batch Render Queue using Adobe Media Encoder.
He selects in and out points for each camera angle, creating dedicated files for each angle.
Josh configures the encoder to render only the specified in and out range on the timeline.
Each camera angle should be exported as an individual MP4 file, specifying the folder location and file name.
Finalizing and Organizing Project Files 6:40
Josh emphasizes the importance of organizing project files, including original source files, rendered clips, and project files.
He advises saving the video editing project frequently as a fail-safe for future edits.
Josh highlights the need to review source footage for any performance anomalies and correct them.
The workflow allows for the removal of outdated avatars and recreation without problematic movements.
Backing Up and Scaling Content Production 8:25
Josh frequently backs up his entire project folder by compressing it into a zip file for disaster recovery.
He mentions the time investment upfront to create polished assets and resolve hiccups.
Josh advises starting with manual methods and gradually scaling to more advanced techniques.
The well-organized project structure saves time, enables content production scaling, and supports high-performance results.
AMP LinkedIn Week 1

Nine months. That’s how long my membership launch lived on a whiteboard. Every week, I added more ideas, more sticky notes, more to-dos. And every week, I was no closer to going live.
If you’ve ever felt buried under your own plans, you know the weight. The irony is that my mountain of planning was the very thing keeping me from taking the first step. Here’s how I went from paralyzed by preparation to launched — with paying members — in just three weeks.
I remember standing in my office one Thursday afternoon, staring at the board. On one side was a list of forty-seven must-have features. On the other, a launch calendar with more arrows, colors, and timelines than a NASA mission.
I was stuck. Not because I didn’t care — I cared too much. I wanted the launch to be perfect: flawless videos, a polished funnel, airtight automations. The problem was, I was treating my membership like it needed to open as a finished empire instead of a simple starting point.
Every day I thought, I’ll start recording once I finish mapping the bonus modules. Or, I’ll build the checkout once I’ve found the perfect upsell. It felt productive, but deep down, I knew it wasn’t movement. It was delay in disguise. And with each passing week, the gap between where I was and where I wanted to be only grew wider.
Then something snapped. I had just finished a call with a friend, another entrepreneur who launched her program with one core module and an email subscription membership. She had paying members in a week. It wasn’t jealousy that got me. It was clarity. She wasn’t waiting for perfect. She was building momentum.
That day, I erased the whiteboard and decided I would launch in twenty-one days, no matter what.
I called it my momentum launch. Instead of trying to launch everything, I focused on three things: a clear promise — the result members could expect after thirty days inside; a minimal viable experience — the smallest content needed to deliver that promise; and a simple sign-up path — one page, one checkout, no detours.
The moment I committed, everything shifted. Decisions became easier. If it didn’t Serve those three goals, it didn’t make the cut. I swapped my forty-seven must-have features for three lessons recorded on my phone. I replaced my complex funnel map with a single landing page. And instead of spending two weeks choosing a webinar platform, I sent personal invites by email.
On day twenty-one, my imperfect membership opened to paying members. No massive content library. No cinematic videos. No labyrinth of automations. Just a clear promise, a simple experience, and a way to pay.
And the craziest part? Those members were more engaged than I’d ever seen in my later, more polished launches.
If you’re stuck in the planning loop, here’s how to run your own three-week momentum launch:
Step 1: Define the Promise, Not the Product Your members aren’t buying a collection of modules — they’re buying a transformation. Write one sentence: after thirty days in my membership, you will be able to [fill in the blank].
Step 2: Build the Minimum Viable Experience Start with the smallest content set that delivers the promised result — maybe three lessons, one live call, or a simple challenge.
Step 3: Create a Simple Sign-Up Path Confusion kills conversion. Keep it to one landing page, one clear pitch, and one join now button.
Step 4: Set a Non-Negotiable Launch Date Give yourself twenty-one days. Announce it. Work backward. Eliminate the fluff.
Step 5: Launch and Learn Treat it as a beta. Your goal isn’t perfection — it’s proof.
I get it. You want your first launch to be flawless. But perfection is a moving target, and the people you’re meant to help aren’t waiting for perfect. They’re waiting for you.
Those members from my imperfect launch? Many are still with me today. Not because I had the slickest platform or fanciest videos, but because I got them results. You don’t need more time. You need a start date. You don’t need a bigger plan. You need a smaller, sharper one. And you don’t need permission. You need momentum.
If you’re ready to stop circling your launch and start moving, I’ve put together my Momentum Map — the exact twenty-one day checklist I used to go from stuck to launched with my first paying members. It’s free, and it’s built for busy entrepreneurs who want to start earning without building a content empire first.
Send me a message and I'll send it to you.
Your membership doesn’t have to be perfect to change lives. But it does have to exist. Let’s make sure it does — three weeks from today.
AMP LinkedIn Week 2
The first time I turned on my camera to record a course, I froze.
My hands were sweaty. My mouth went dry. My carefully written notes blurred together like nonsense. I stumbled through three sentences, stopped, hit delete, and shoved the camera back in its box.
For weeks, it sat on my desk like a silent judge.
Every day I avoided recording was another day I delayed building my membership. But I kept telling myself, I’ll start once I feel more confident. I’ll start when I have the right setup.
And here’s the truth: if you’ve ever felt this way, you’re not alone. Being on camera feels vulnerable. It forces you to see yourself the way others do.
But avoiding the camera doesn’t just hold back your content — it holds back your business.
Here’s what I eventually realized: it wasn’t that I lacked confidence as a teacher. I’d spoken to classrooms, led workshops, even presented on stage. Live teaching energized me.
But the moment the little red light blinked on, something changed.
Why? Because the camera felt like a spotlight without feedback. No nods, no smiles, no laughter to ease the tension. Just me, alone with my own self-doubt.
That self-doubt whispered:
Those whispers grew louder than my content.
And instead of pressing record, I started tinkering with gear. Maybe a better microphone would help. Or professional lights. Or a script so tight I couldn’t possibly mess it up.
Spoiler: none of that solved the real problem.
One day, a mentor asked me a question that changed everything.
“If you had 10 of your ideal clients sitting in a room right now, could you teach them?”
I laughed. “Of course.”
“Then do exactly that,” he said. “Talk to the camera like those 10 people are right there.”
That single shift broke the spell. I stopped seeing the camera as a machine judging me and started seeing it as a bridge connecting me to real people.
The first video I recorded after that wasn’t perfect. I stumbled over a phrase. My lighting was uneven. But when I watched it back, something struck me: it still worked. My teaching came through.
And when I finally shared it? My audience didn’t care about the stumbles. They cared about the clarity, the story, and the value.
That’s when I realized: confidence isn’t a prerequisite for recording. Confidence is the result of recording.
If the camera is holding you back from launching your course or membership, here’s a simple roadmap I wish I’d had sooner:
Step 1: Focus on One Person, Not an Audience
Imagine your best client sitting across from you. Record your video as if you’re speaking only to them. The intimacy makes your delivery warmer and more natural.
Step 2: Lower the Stakes
Stop treating your first recordings like a TED Talk. Start with a 3–5 minute tip video. One take, no pressure. The point isn’t perfection — it’s momentum.
Step 3: Create Comfort Through Familiarity
Record in a setting you already feel relaxed in — your home office, a quiet corner, even your kitchen table. Confidence grows where comfort lives.
Step 4: Watch Yourself With Curiosity, Not Criticism
When reviewing your video, ask: Did I explain this clearly? Would my client understand it? Don’t obsess over your hair, voice, or background. Your audience won’t.
Step 5: Practice Consistency Over Perfection
Confidence is a muscle. Record regularly, even if you never publish some takes. Every rep makes the next one easier.
For months, I thought I needed to become someone else to be confident on camera. Maybe more polished, more charismatic, more “professional.”
But the truth is, I didn’t need to become someone else. I needed to become more myself.
Confidence didn’t come from fancier gear or flawless delivery. It came from letting go of performance and focusing on connection.
Once I stopped trying to impress and started trying to Serve, everything changed.
The longer you avoid the camera, the longer you delay your membership growth.
Video accelerates trust. It allows your audience to see your face, hear your voice, and feel your authenticity in ways text alone never can.
You don’t need to master video to get results. You just need to show up.
Because your audience isn’t waiting for a polished performer. They’re waiting for you — the real you, sharing what you know in the way only you can.
If camera nerves are holding you back, I’ve put together my On-Camera Confidence Checklist — the 7 steps I used to go from frozen to fluent on video.
It’s free, and it’s designed for entrepreneurs who want to record authentic, engaging lessons without waiting until they “feel ready.”
Send me a message and I'll connect you with what you need to move forward.
The fastest way to get better on camera is to start.
This checklist will help you take that first step today.
Anomaly Partners Overview
Welcome to the Anomaly AMP Sales Partner Program. You now have access to a system that helps real businesses solve real operational problems while giving you the opportunity to build long-term recurring revenue and leverage.
This is the point where momentum begins.
You are stepping into more than just a referral opportunity. You are entering a meaningful path that allows you to help business owners move toward more clarity, continuity, and stability while also growing your own recurring revenue over time.
There is a big difference between promoting something random and representing something that genuinely improves how a business runs. That is what makes this opportunity different.
Anomaly AMP is not just another software tool.
It is durable business infrastructure. It Serves as an operating system for businesses that need more alignment, less fragmentation, and a stronger foundation for growth.
Instead of forcing businesses to patch together disconnected tools and workflows, AMP helps them operate with more clarity, more continuity, and less chaos. That is why customers stay. In many cases, they stay for years. Some have stayed with us for over 15 years.
When you introduce the right person to AMP, you are not adding noise to their life or business. You are helping create alignment.
This opportunity is for people who want to build lasting recurring revenue and who also care about making thoughtful, high-fit introductions.
Your role is not to pressure people. Your role is to recognize product fit, share helpful resources, and connect the right businesses to something that can genuinely improve the way they operate.
That is the lens to carry with you throughout this experience.
Inside the partner experience, you will learn how to:
This is designed to help the process feel lighter, clearer, and easier to act on.
For now, keep it simple.
Start with the Partner Center Tour so you can see where everything lives and how the system is organized. Once you understand the layout, everything becomes easier to navigate and easier to use.
That clarity is what creates momentum.
There are no Main Site search results.